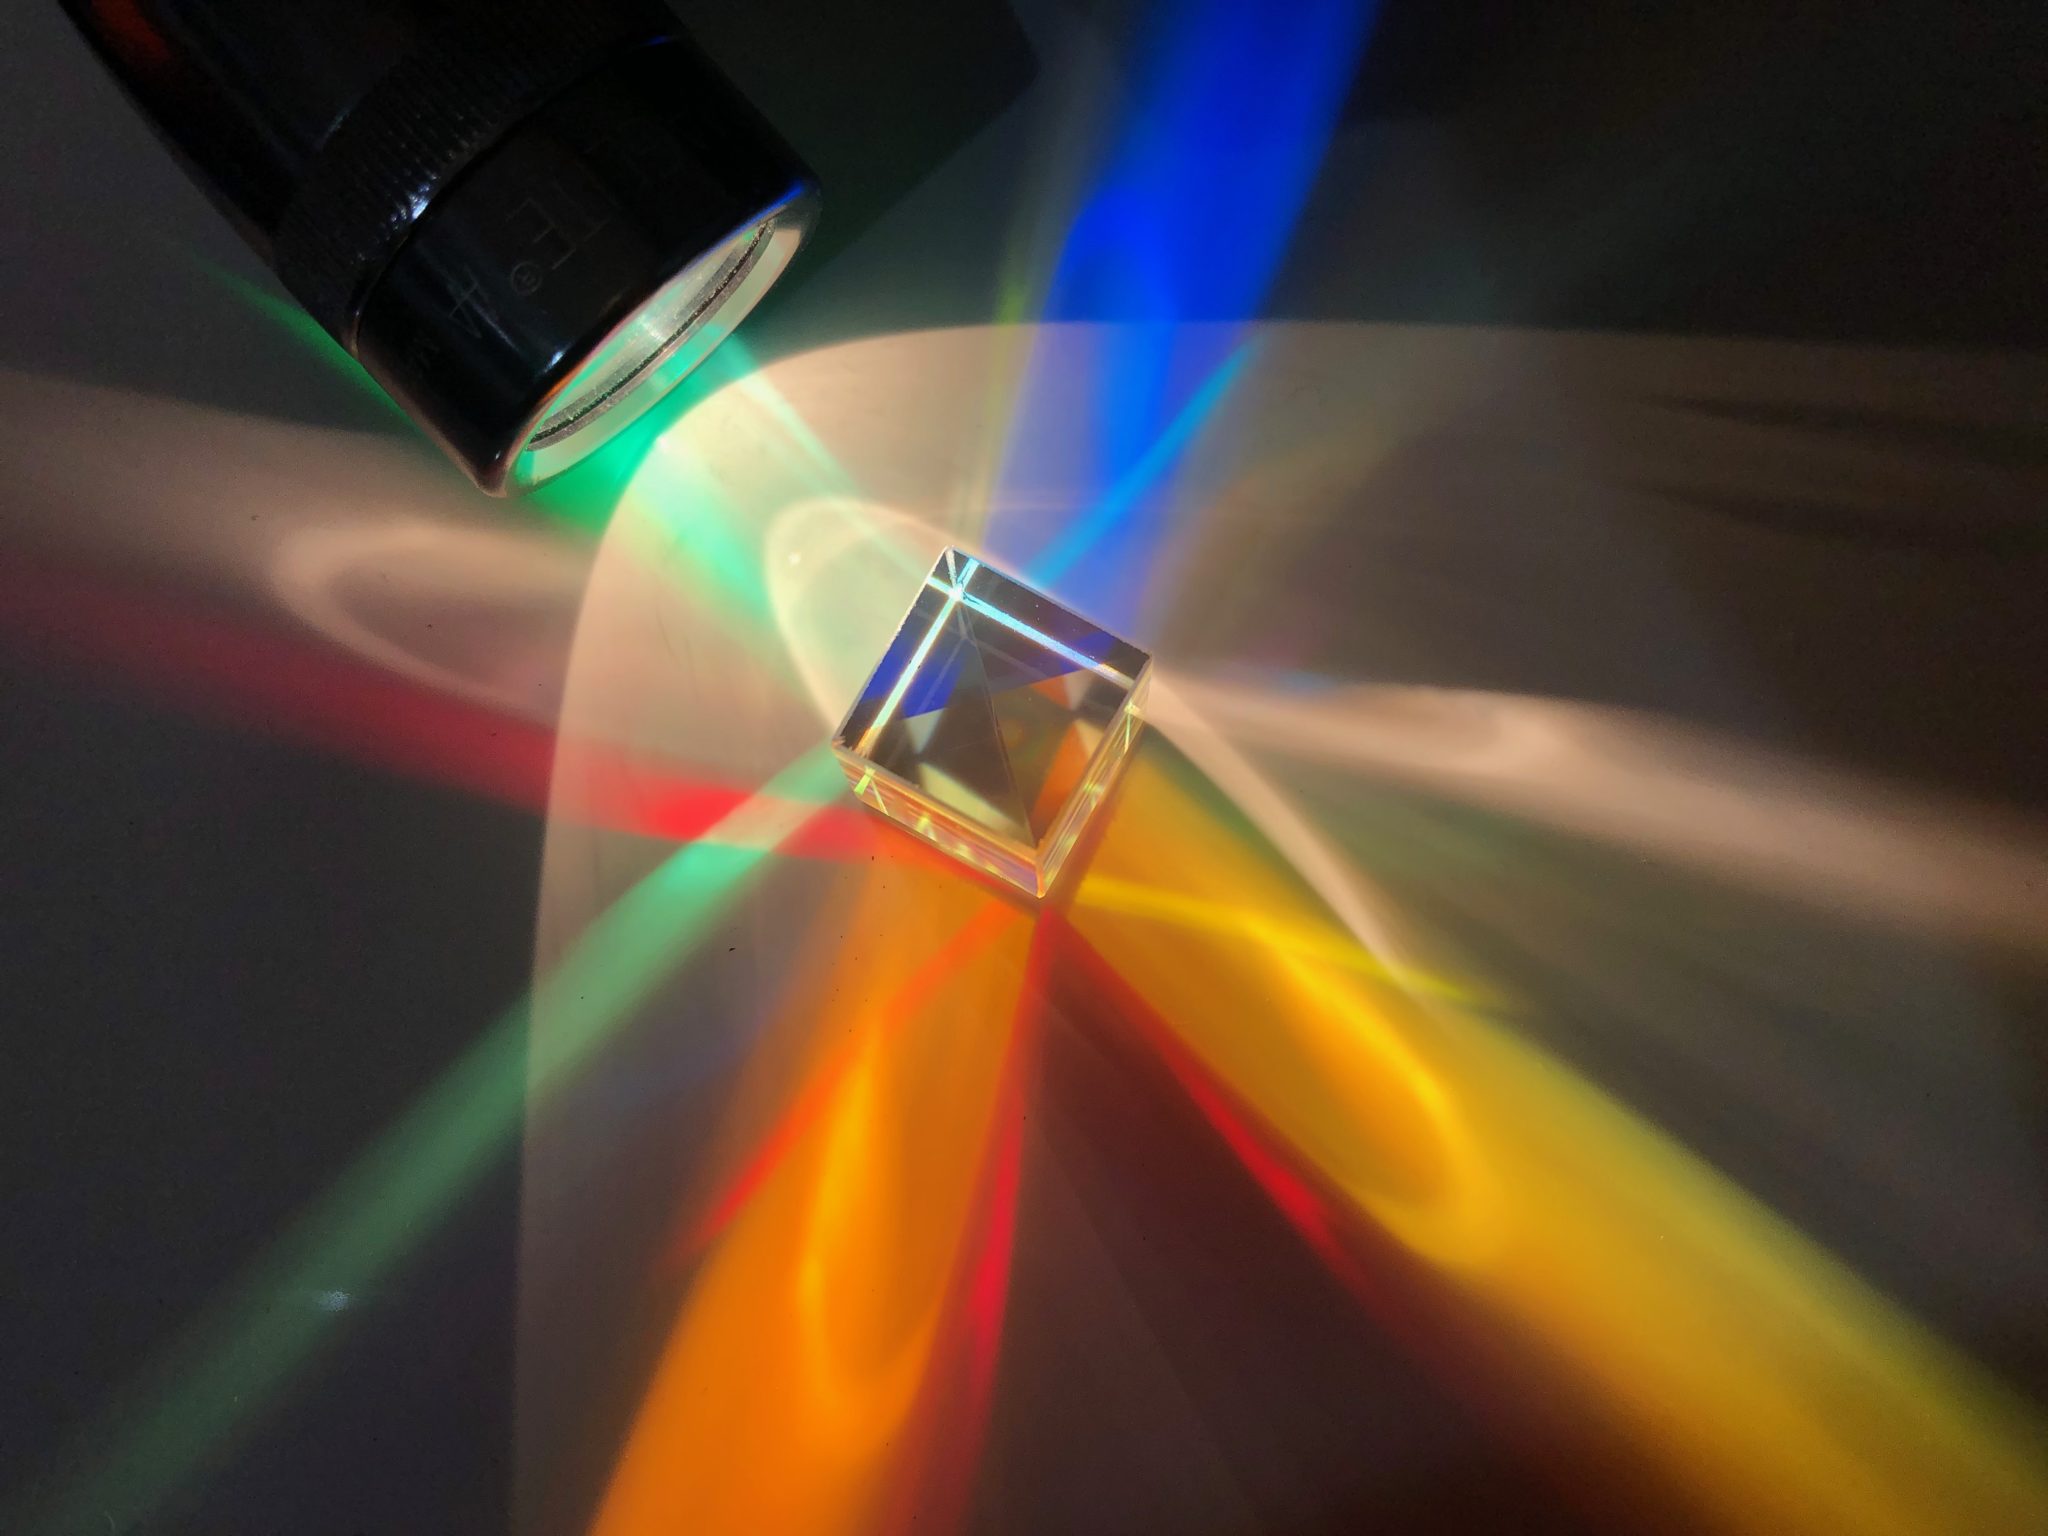
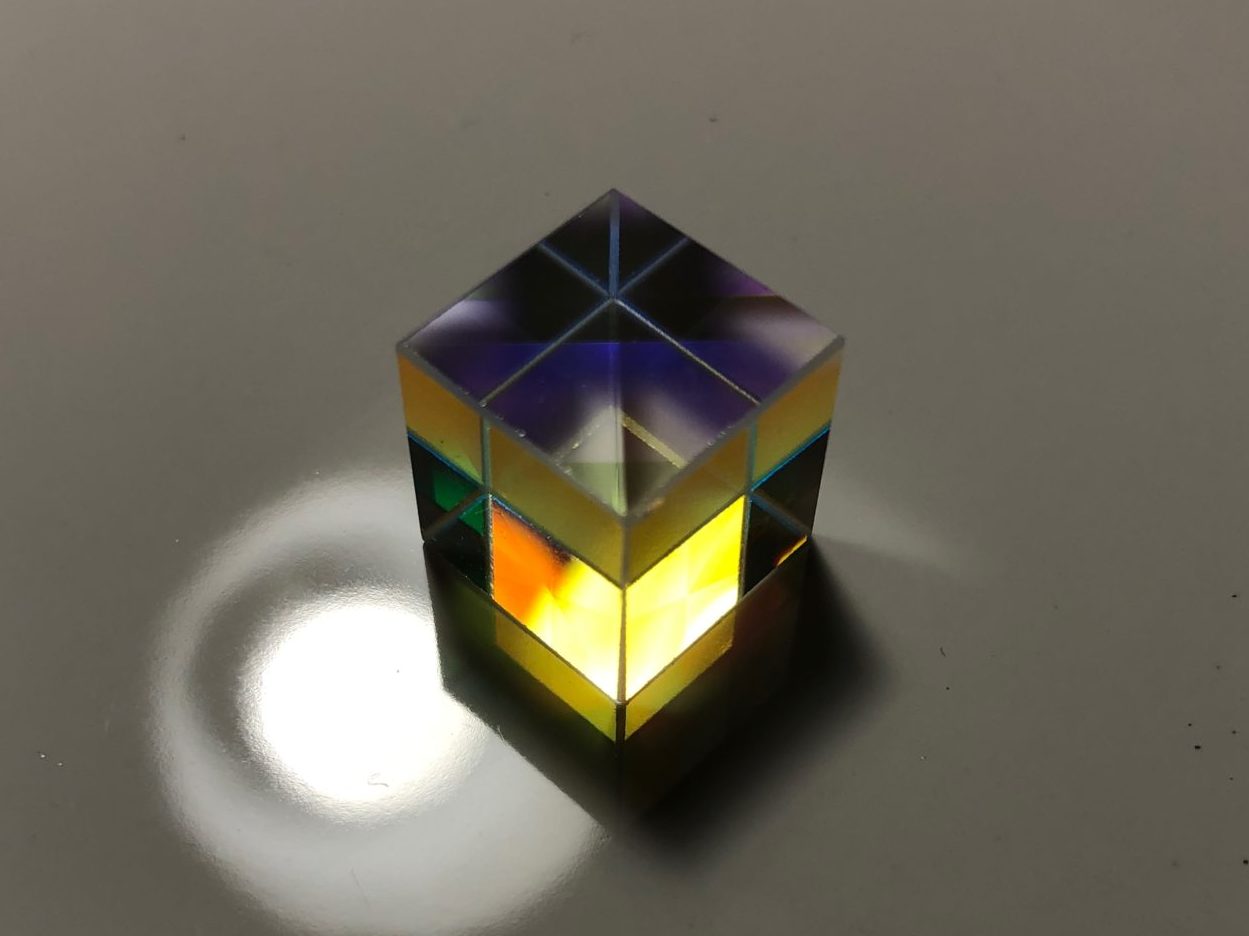
One of my favorite optical devices is the dichroic cube. At first glance, it might look like an ordinary chunk of glass, but it’s got a few optical tricks up its sleeve.Catch the light on it just right, and it fills with a vibrant rainbow of color! This isn’t just a prism, either. Each of its faces illuminates in a distinct color, and the colors even change when you look through different sides! You might not have seen these cubes out on their own (unless you’re like me and love playing with various optical toys), but you’ve probably already encountered a product or two that uses one.
How it Works
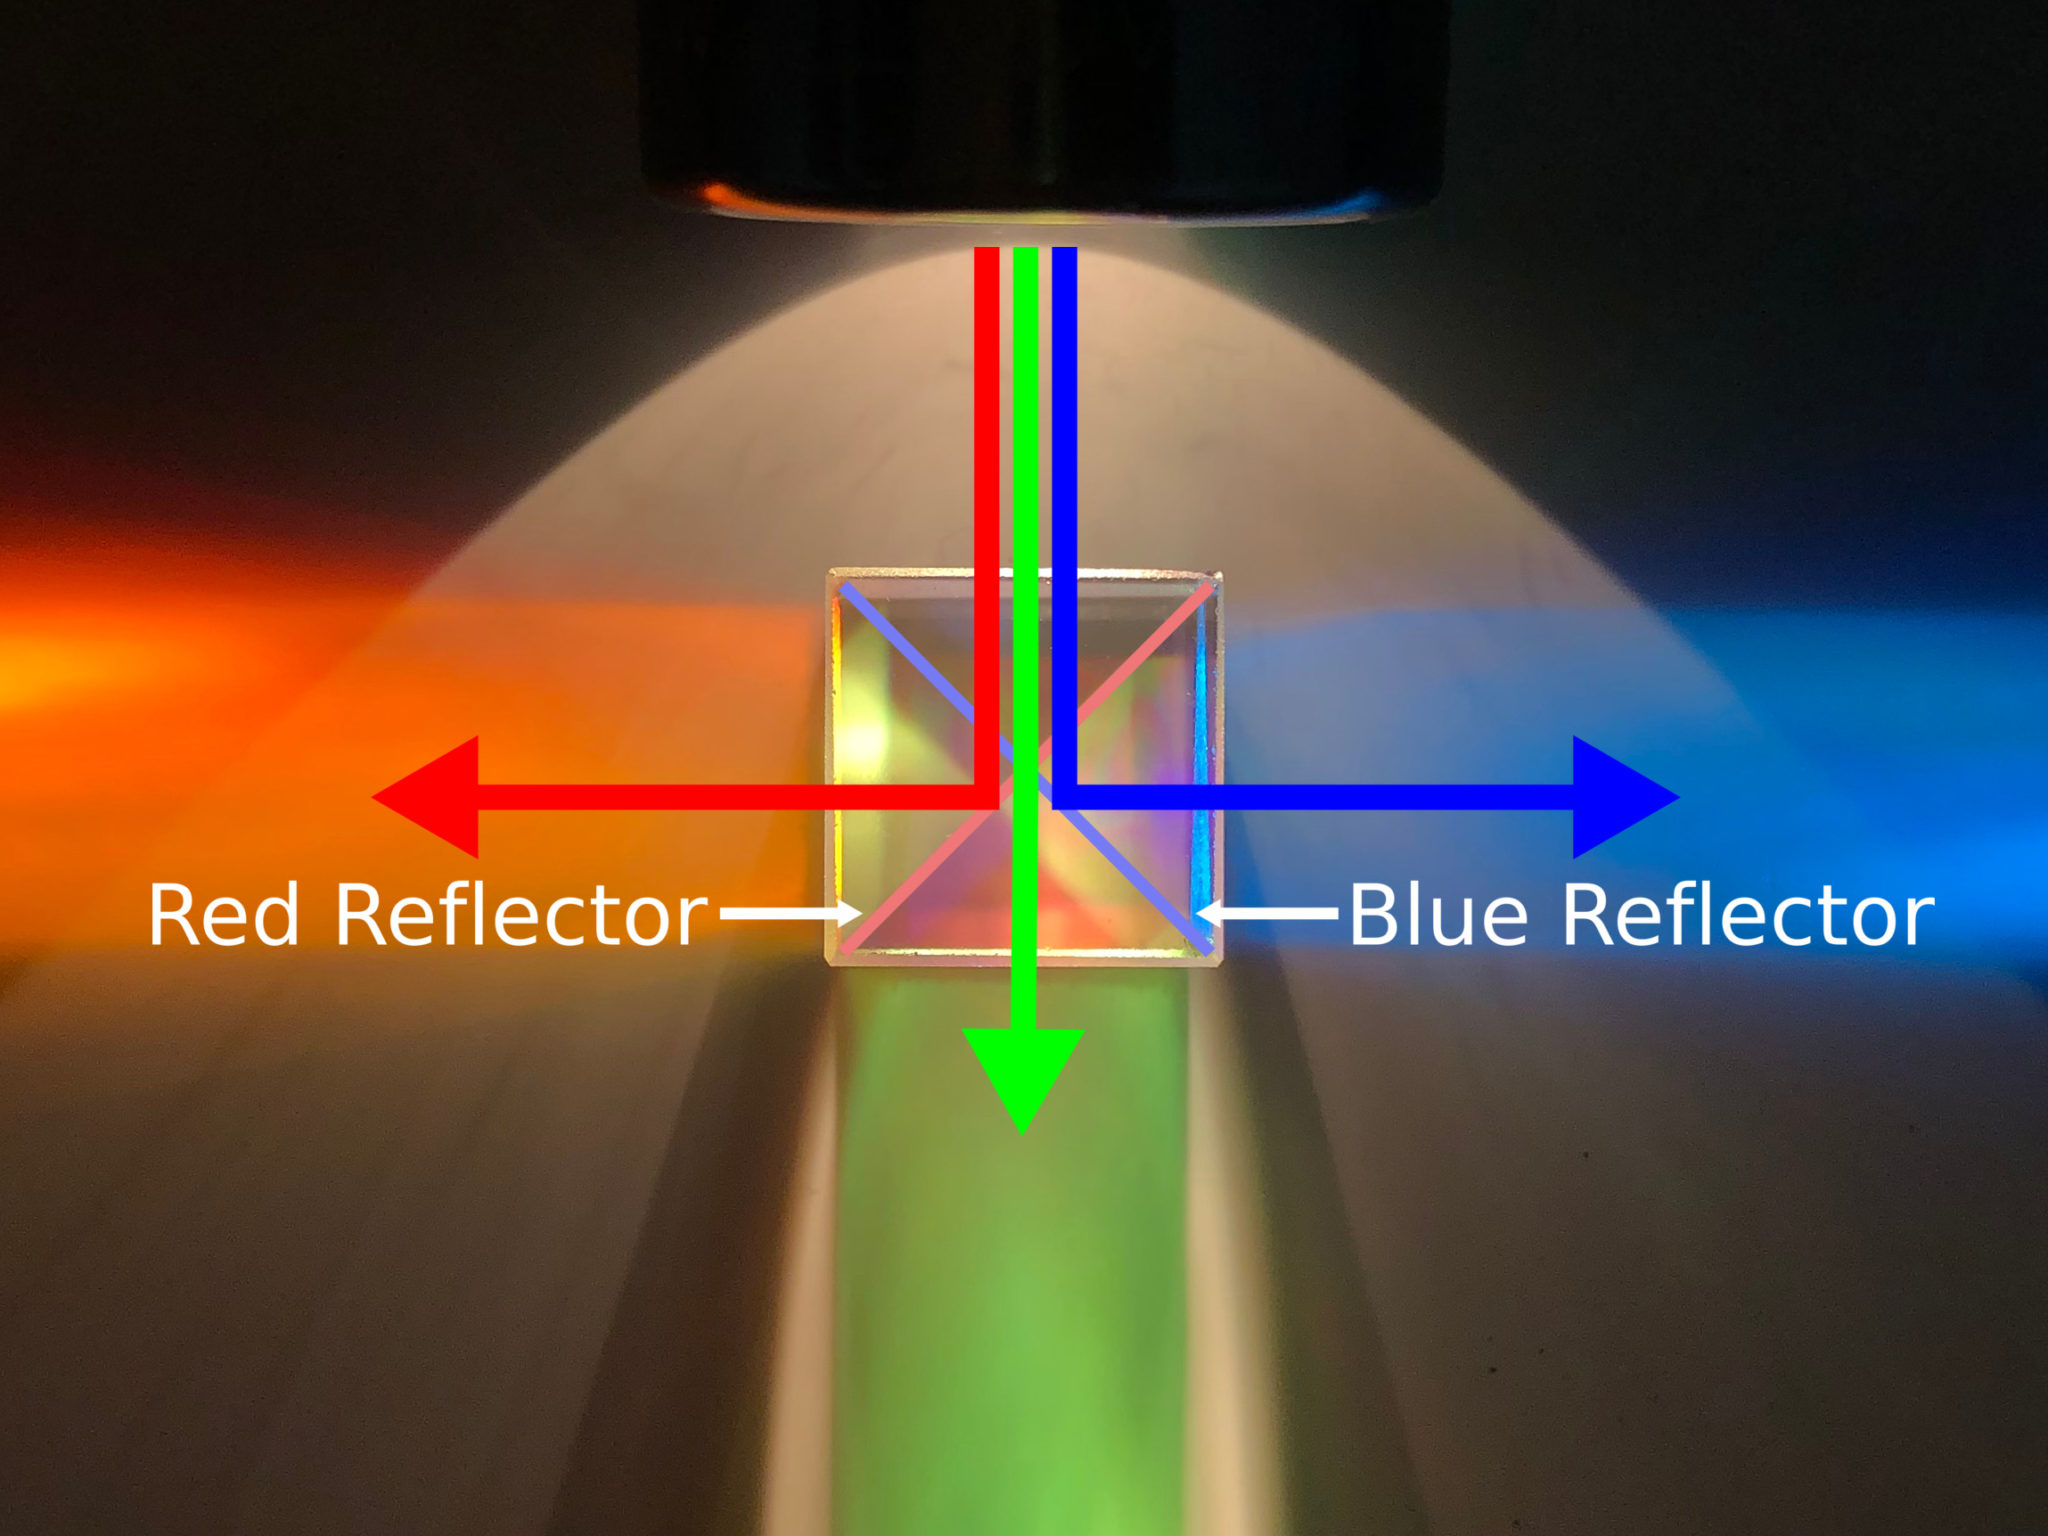
A Dichroic cube is a special arrangement of filters and prisms that can reflect different colors of light in different directions. When light enters one face of the cube, the special nanometer-thin coatings inside the prism either reflect or pass through light depending on its wavelength. [1] These coatings are called dichroic coatings, meaning “two-colored”, in reference to the two colors that split off when they encounter the coating, and give the dichroic cube its name. One coating reflects only red light and sends it out one side of the cube, and another only reflects blue light, sending it out another side. The remaining light (which is mostly green), passes straight through the cube. [2]
Dichroic Cube Application: Projectors
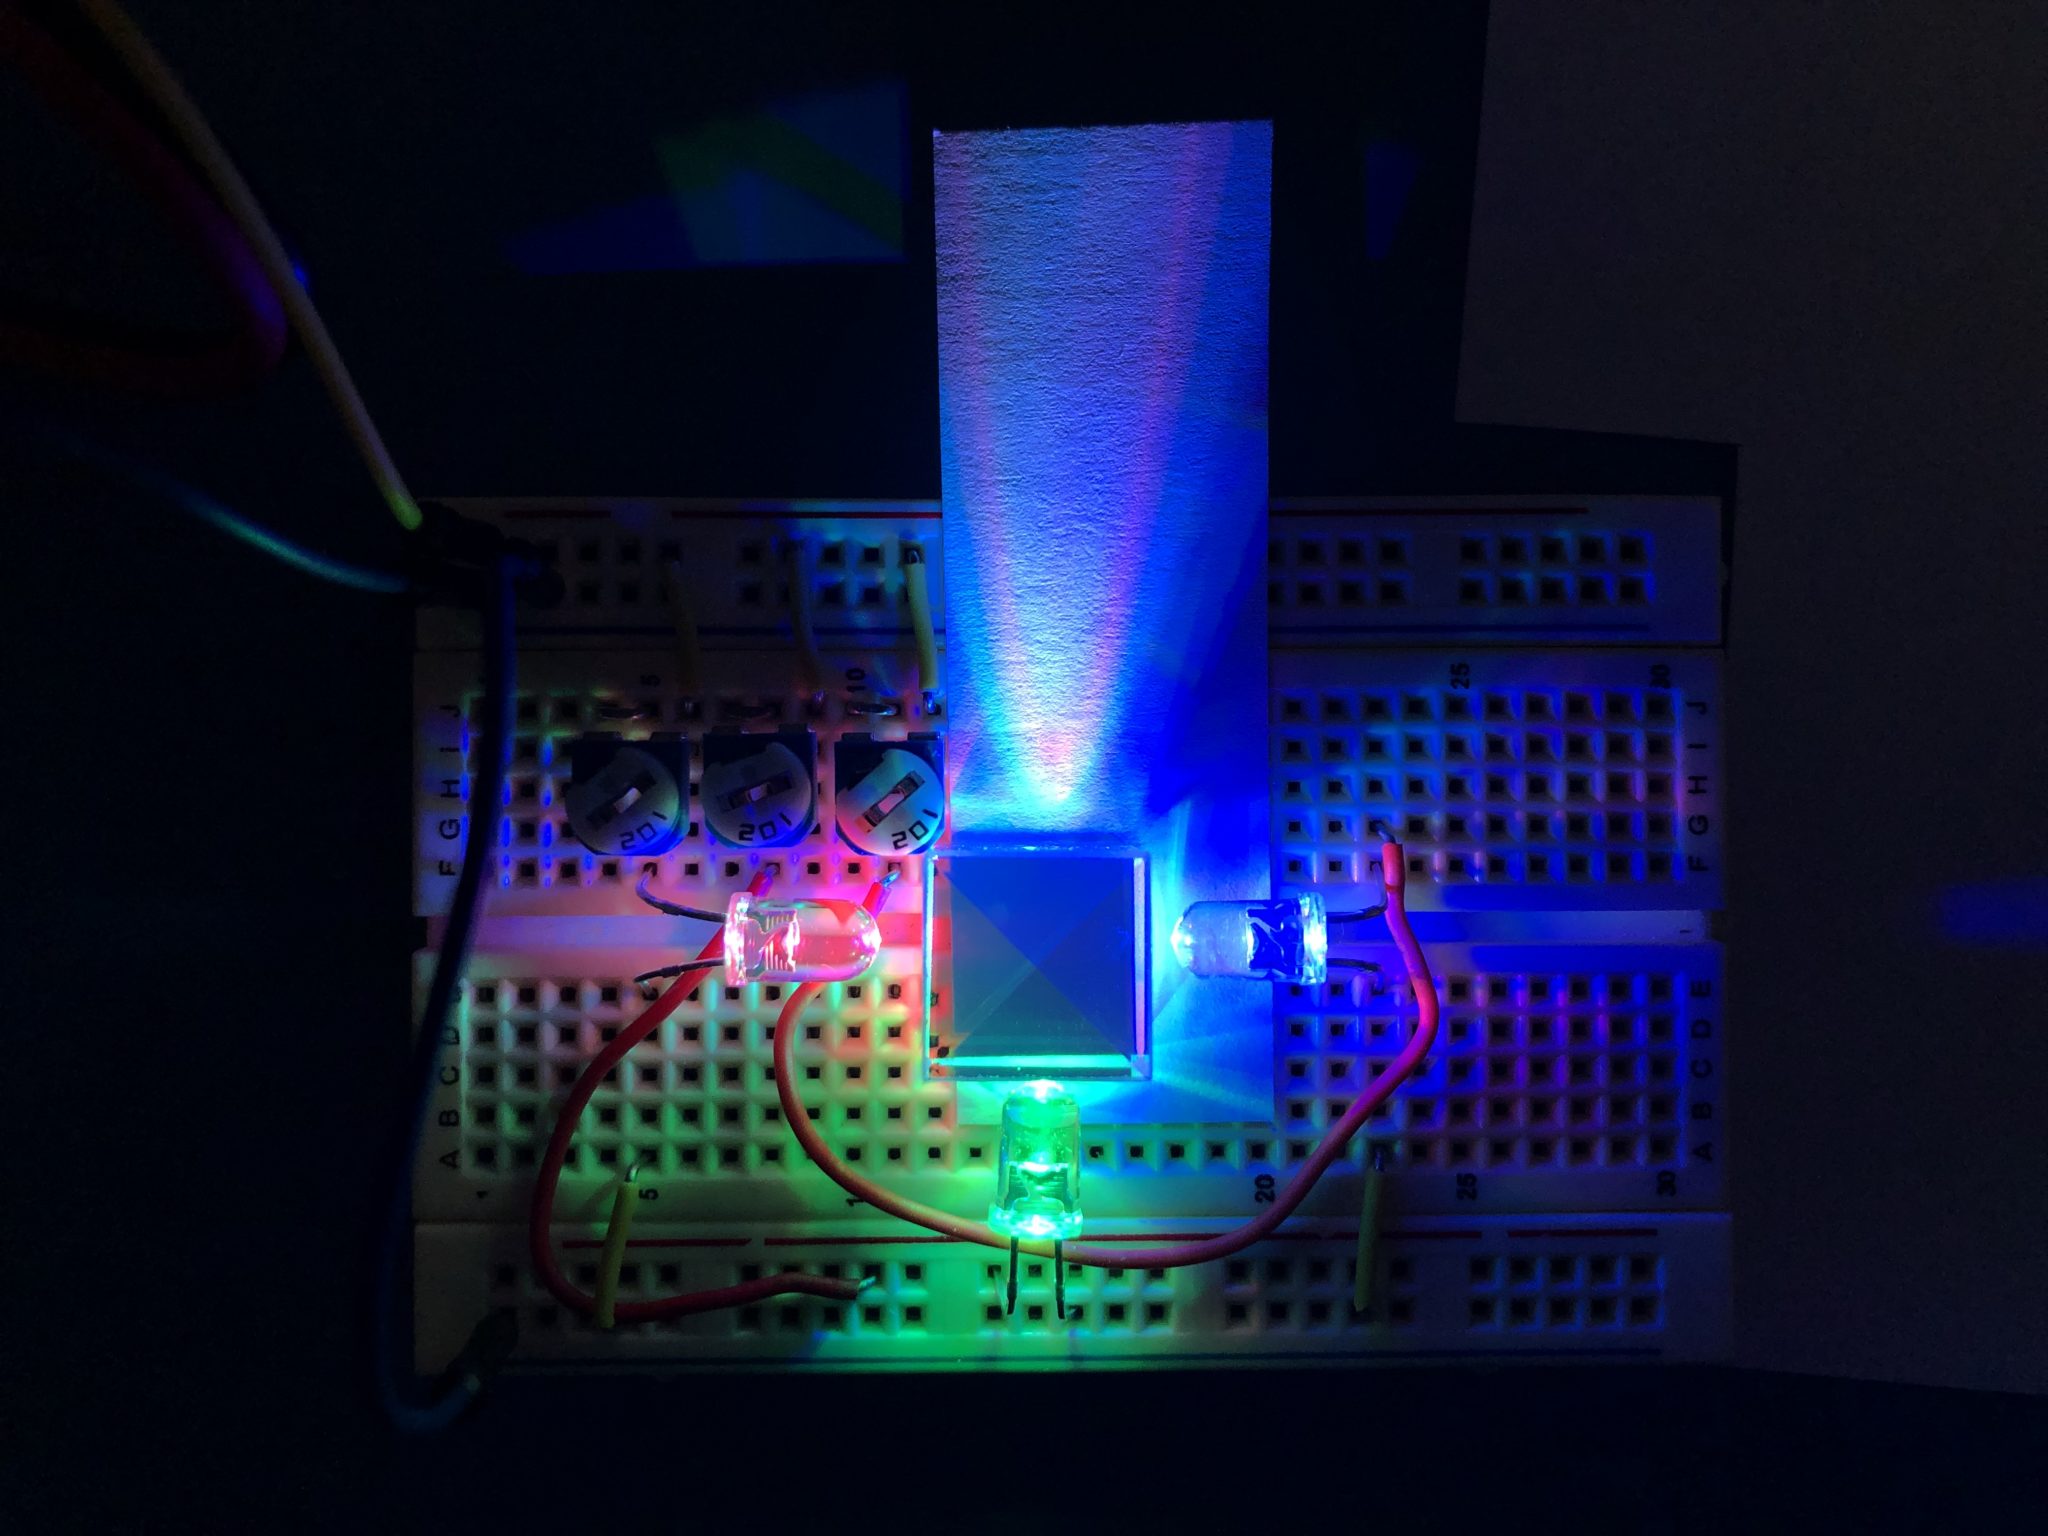
Dichroic cubes can also work in reverse, combining Red, Green, and Blue light into a single beam. This property is employed in some digital projectors to create color images. The image-producing components of these projectors create separate Red, Green, and Blue images, which need to be brought together to form the final image that you see. This is the perfect job for the dichroic cube because its color reflection properties allow Red, Green, and Blue light to enter from different sides and “stack” to form the combined image, with all three images aligned exactly the same way. [3]
Where to Find One
The best part about dichroic cubes is that, if you know where to look, you can find them for very cheap! Stores on eBay sell them for a few dollars shipped under some combination of the keywords “dichroic”, “prism”, and “X-Cube”. They make great gifts for your physicist friends! In my opinion, a dichroic cube is one of the coolest cheaply-obtainable pieces of optics gear (alongside polarizing films and diffraction gratings, of course!), and is a great teaching tool for learning about colors and wavelengths.
Lab: Tracing Light Paths Through a Dichroic Cube
I couldn’t leave without an obligatory laser experiment, so here’s a quick and simple one to get started.
*Caution: Only use lasers with 5mW or lower output power for this experiment. Observe proper laser eye safety procedures.
Materials
- Dichroic Cube
- Red Laser Pointer
- (A laser isn’t strictly necessary here, but its narrow beam makes it much easier to follow the light path. Any red light, such as that from an LED, will suffice for this experiment)
- A Flat, Light-Colored Surface
Procedure
- Place the dichroic cube near the center of your light-colored surface, with the “X” pattern facing up.
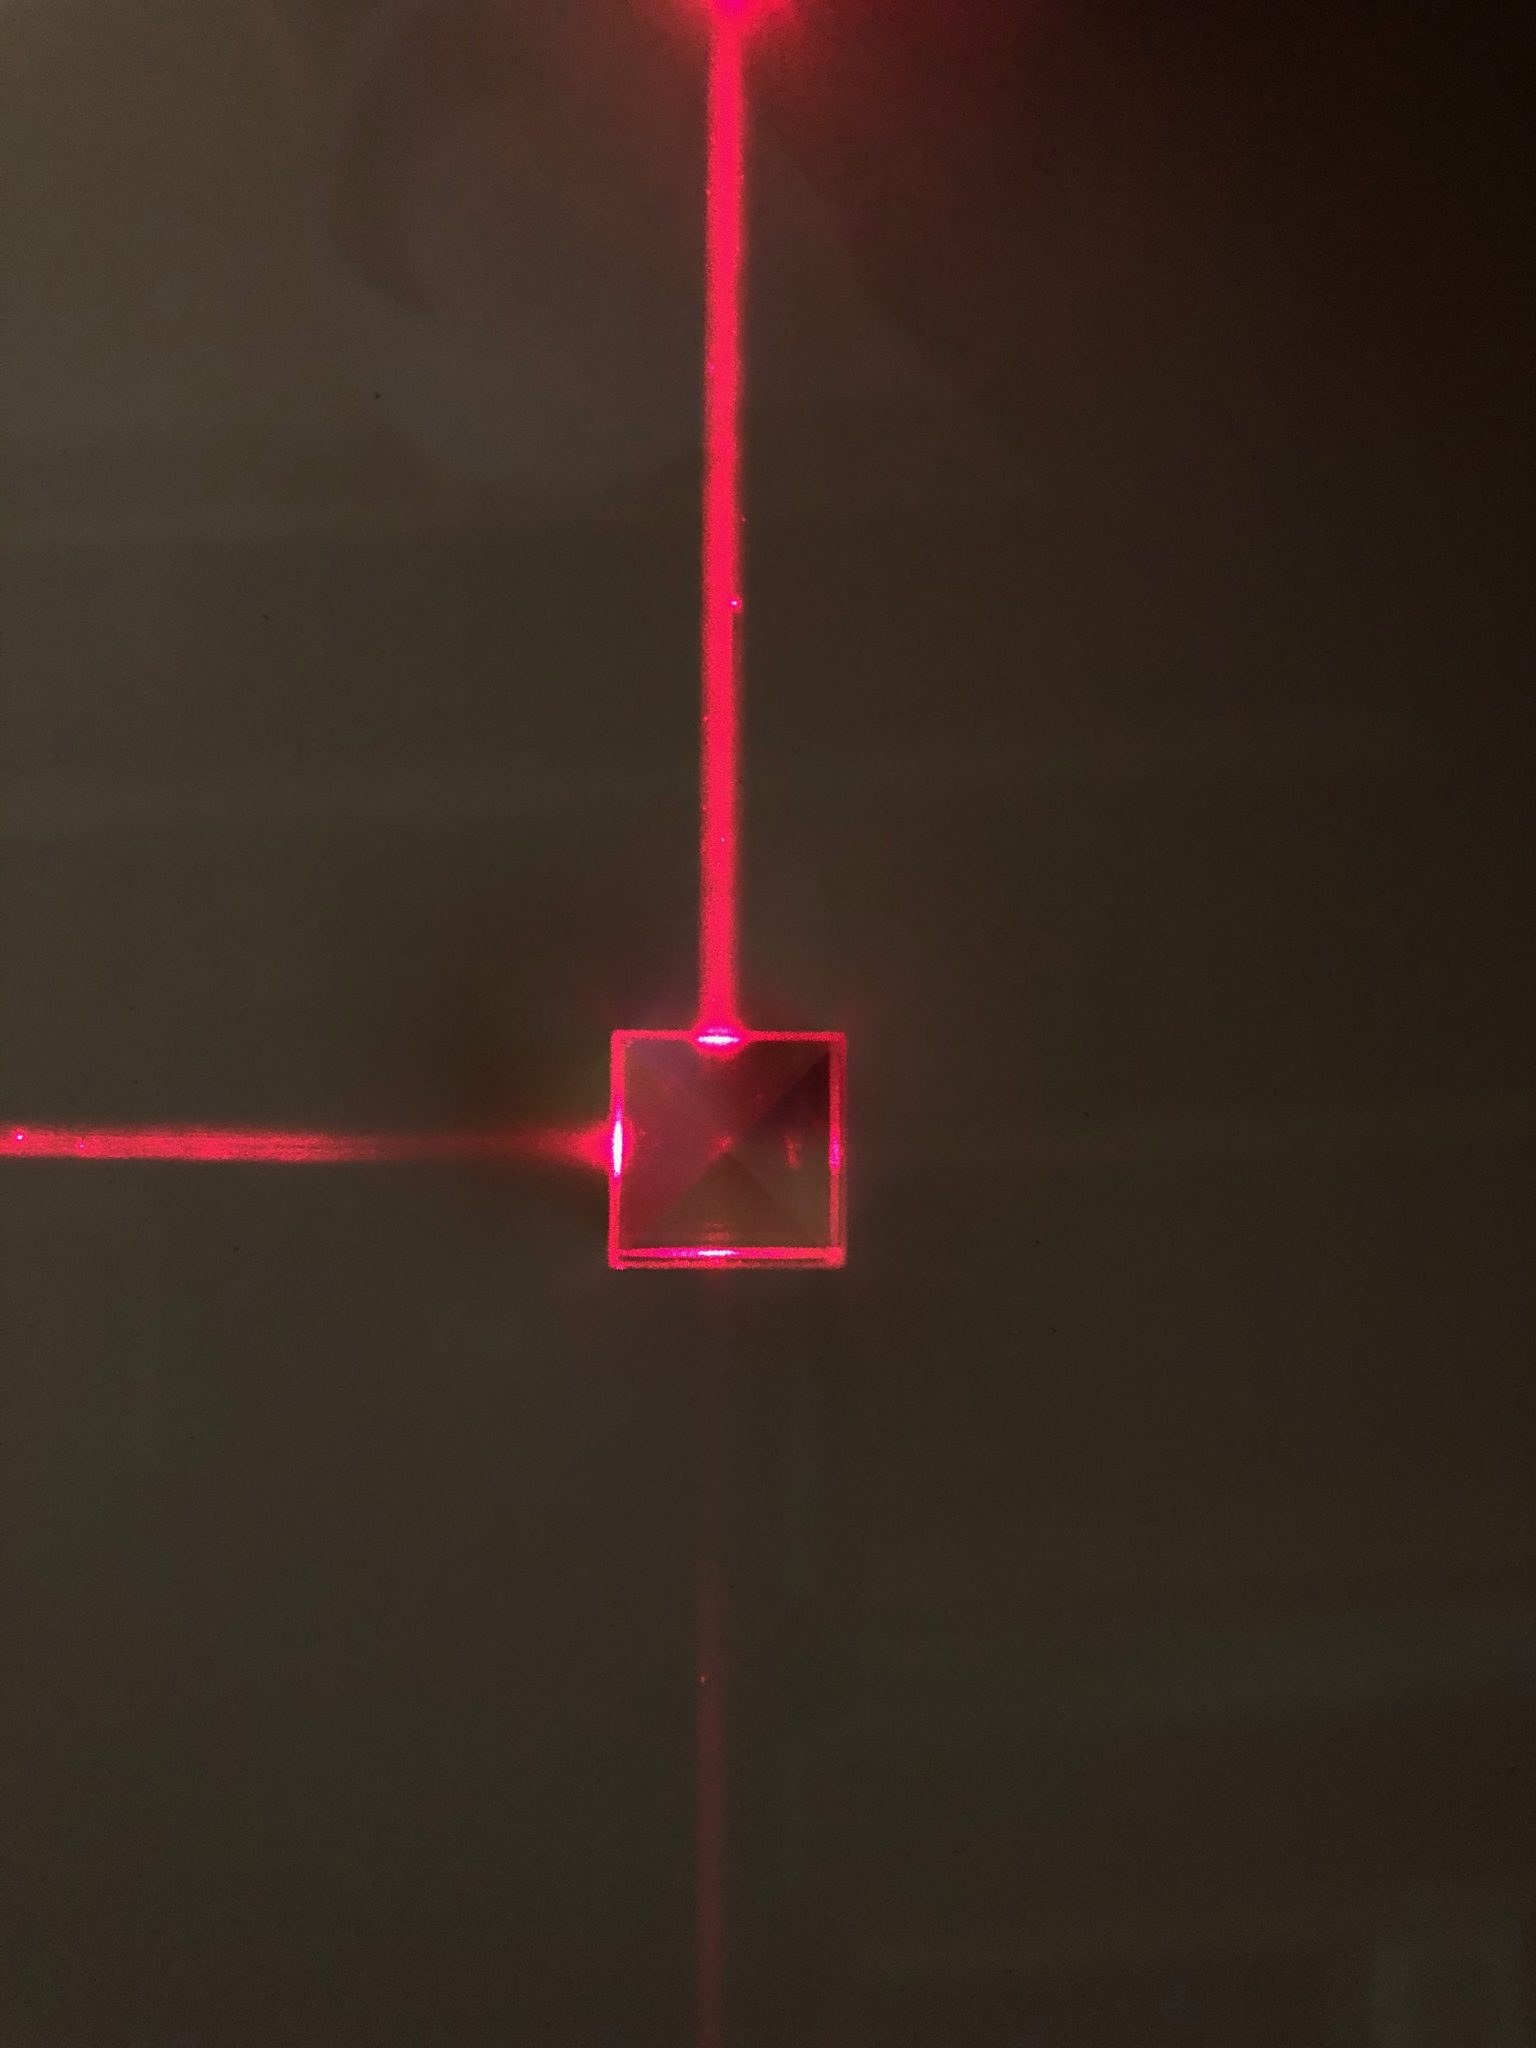
- Shine the laser through one of the sides of your dichroic cube, making sure the beam is perpendicular to the cube’s face.
- If the laser beam passes straight through the cube without any reflections, make sure the cube is oriented correctly. The “X” pattern should be visible on the top.
- Record which side of the cube the laser light exits, and sketch out the light path through the cube.
- If you place the laser close to the surface and angle it down just a little, you will be able to see the entire beam reflected off the surface.
- You can use a dry-erase marker to put a small dot on one of the corners, to make it easier to keep track of the cube’s orientation.
- Rotate the dichroic cube 90° and repeat Step 3.
- Keep rotating and recording until you have observed all four sides of the cube. Notice how the light path changes depending on which face the light enters.
- Recall how the filters are arranged inside the dichroic cube, and how rotating the cube changes the orientation of these filters.
Extra Credit: Repeat the experiment with different colored lasers, if available. Ideally, try it with a green and blue laser. Does the light travel a different path?
Remarks
You’ll notice that, although most of the red light goes out one side, a little bit passes straight through the cube. The cube doesn’t have perfect filters, and the exact wavelength of light reflected depends on its angle and placement. We also can’t guarantee that the laser diode is perfect, either (although it tries its best). Combine all these things, and a little bit of light leaks through. However, this shouldn’t affect your experiment much, since the reflected beam is much brighter.
Completed this experiment? Feel free to comment below or share your observations!
Notes/References
- The physics behind this is super cool. In short, light reflects from both the top and bottom edges of the coating. Since the light rays traveled different distances, their phases are slightly different when they meet up again. This means that some wavelengths constructively interfere, while others cancel out. Look up “Thin Film Interference” if you want to learn more.
- https://en.wikipedia.org/wiki/Dichroic_prism
- This technology goes by the trade name “3LCD”, in reference to the three liquid-crystal panels inside that generate the Red, Green, and Blue images. Chances are good you’ve used one of these projectors before! https://www.3lcd.com/explore/dichroic_prism.aspx