Is your trackpad clicking randomly? Dragging files around and acting like it’s haunted?
My MacBook Air fell victim to this issue, and I can say for sure that it’s super annoying and pretty difficult to troubleshoot due to its intermittent nature. Buttons were being accidentally clicked, text was being dragged around, and–worst of all–files were being accidentally deleted. The lightest of touches would send my trackpad into a frenzy of uncontrolled clicking!
Scouring forums, support communities, and more, I tried practically every permutation of these commonly suggested fixes, to no avail:
- Rebooting the machine
- Resetting the SMC/PRAM/NVRAM
- Re-installing the OS
- Disabling Tap-to-Click
Turns out, my trackpad was physically damaged and could not be fixed through software methods. It was pretty simple to fix, but getting to it was quite tricky.
Could your machine be suffering from the same issue? You might notice some of the following symptoms:
- Overly-sensitive clicking, even with light touches
- Unexpected clicking or dragging when moving fingers over trackpad
- Unexpected right-clicking when scrolling
- Single clicks being registered as double-clicks
Continue reading to learn why this happens, or jump directly to the repair procedure
The Cause
The clicks on a MacBook trackpad (before Force Touch came around) are registered through a mechanical button. The entire trackpad hinges down onto this button, which sends the “click” signal to the computer and produces the click you hear and feel.
How the Trackpad Clicks
The trackpad button is quite simple in construction. There’s a tiny dome-shaped piece of metal inside the button that snaps back and forth when you press and release it. This snapping action creates that characteristic sound and completes an electrical circuit telling the computer that you’ve clicked.

The trackpad button is constructed as a pair of circular contacts, with a gap in the outer contact to pass a connection to the inner contact. The dome presses against these two contacts and bridges them together, which is how the computer senses the click.

What’s interesting about this button is that the contacts are actually printed onto the trackpad surface using conductive ink. This means that both contacts are on the same layer. As a result, the outside edge of the metal dome covers both contacts. However, a sliver of insulating plastic shields the center conductor from the outer ring, meaning that the only time the two contacts are connected is when the dome is pressed onto the center contact.
How the Button Breaks
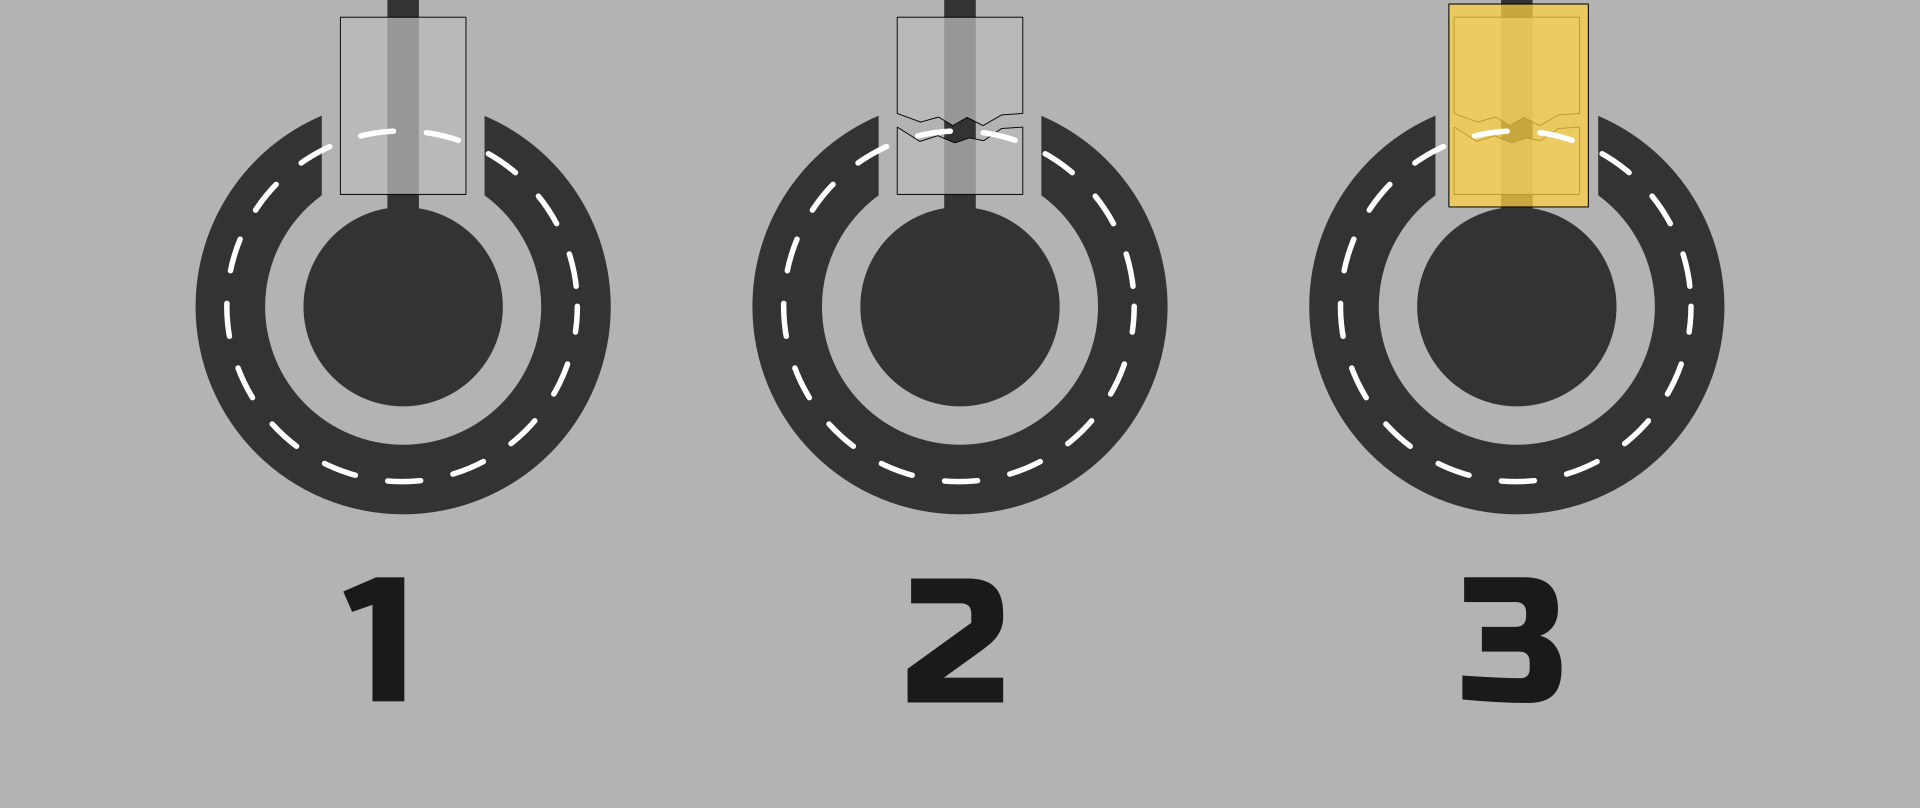
2. Over time, this insulator wears out, exposing the thin trace leading to the center conductor.
3. This can be fixed by applying some tape over the trace.
The metal dome has a sharp edge, and will rub against this insulator a tiny amount with each click. Eventually, the dome will wear all the way through the insulator, causing it to short-circuit the button. This is what causes your trackpad to falsely register clicks.
Repair Procedure
NOTE: This repair involves physical modification of your device and will definitely void your warranty. If your machine is still under warranty, take it back to the store for repair.
For all others, proceed at your own risk:
- What we’ll do is open up the device, take out the trackpad, and replace the insulator on the button. It’s a pretty involved process and requires the removal of several components, so be sure to document exactly where everything goes (I would recommend taking plenty of photographs).
- This repair was performed on the 2011 11” MacBook Air (model A1370), but it should be similar enough for other models with similar trackpads.
- The repair will take 1-2 hours. Perfect for a short weekend project!
Materials
- Plastic Prying Tool/Spudger
- Screwdrivers:
- T5 Torx Screwdriver
- T6 Torx Screwdriver
- #000 Phillips
- P5 Pentalobe Screwdriver
- Kapton Tape (Really any sort of thin plastic tape will work)
- Heat Gun or Blow Dryer
- Fine-Tipped Tweezers
- Screw Organization Tray/Magnetic Mat
- There are lots of screws, and of all sorts of different sizes, so make sure you have a way to keep track of them.
- They’re also really hard to find when they end up on the carpet.
If you’re looking for a place to buy the above tools, my personal recommendation is iFixit.com. (I’m not affiliated with them. However, I’ve bought several tools and parts from them over the years, and have only good things to say.)
Procedure
Step 1: Bottom Case Removal
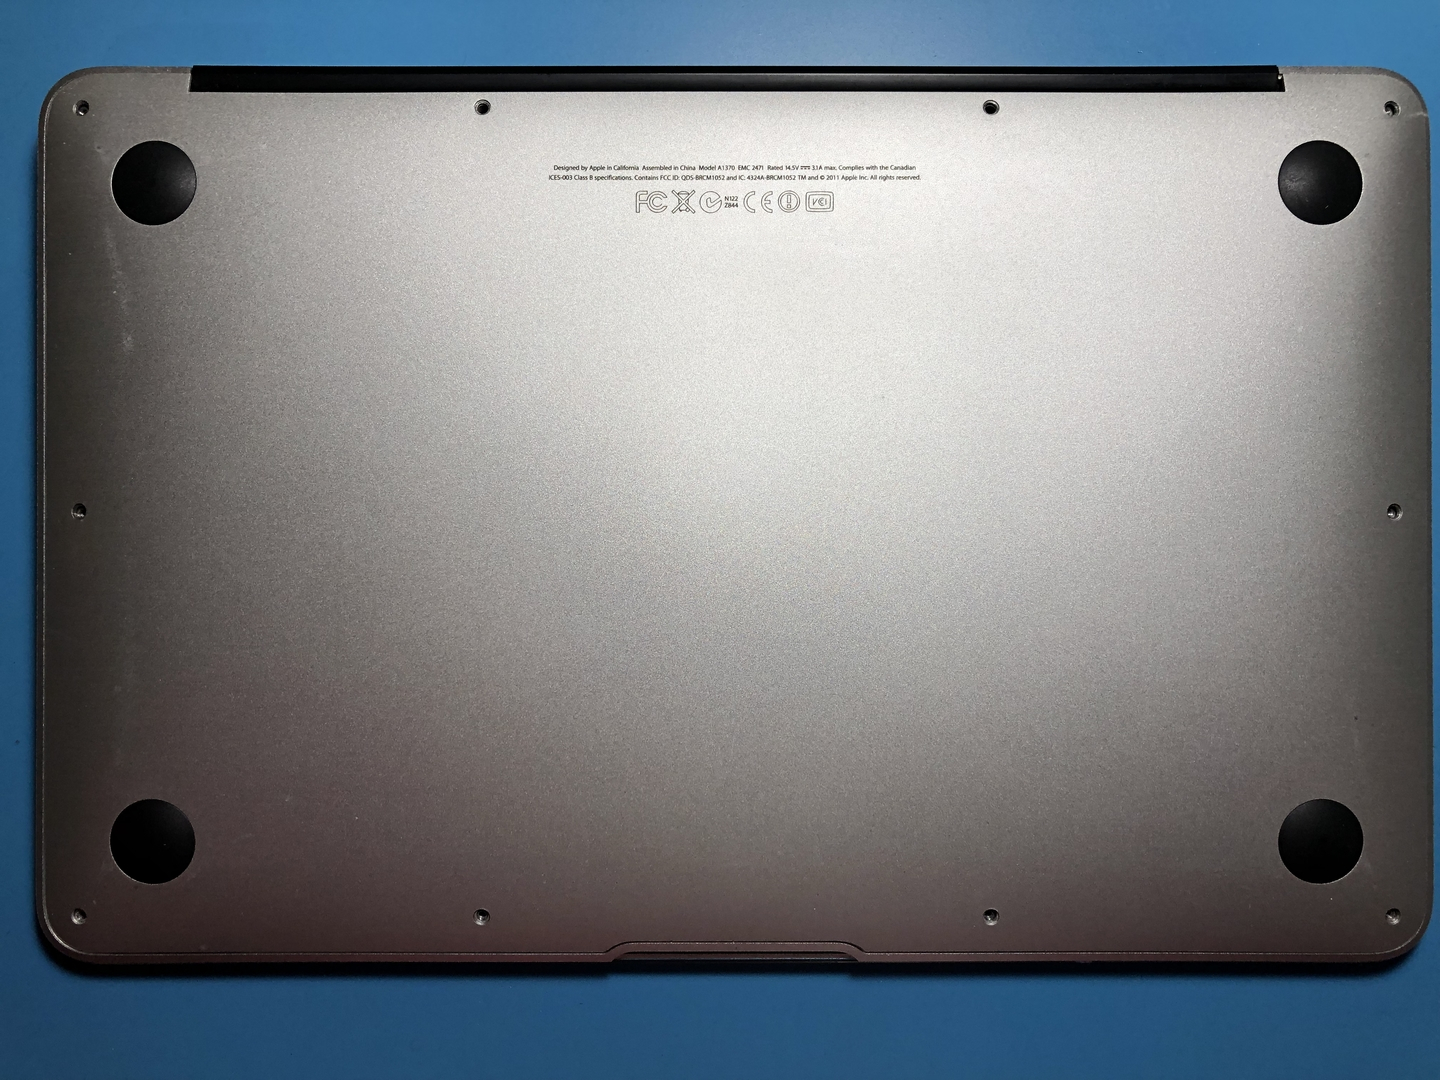
Flip your laptop over and use the P5 Pentalobe driver to remove all the screws holding the bottom case in place.
- Take note of each screw’s location. Some have different lengths. Putting a screw in the wrong place may damage your device.
- Caution: The computer’s internals can be damaged by static electricity. To reduce the risk of damage, ground yourself by using an ESD wrist strap or by briefly touching the aluminum case of the computer.
Step 2: Battery Cable
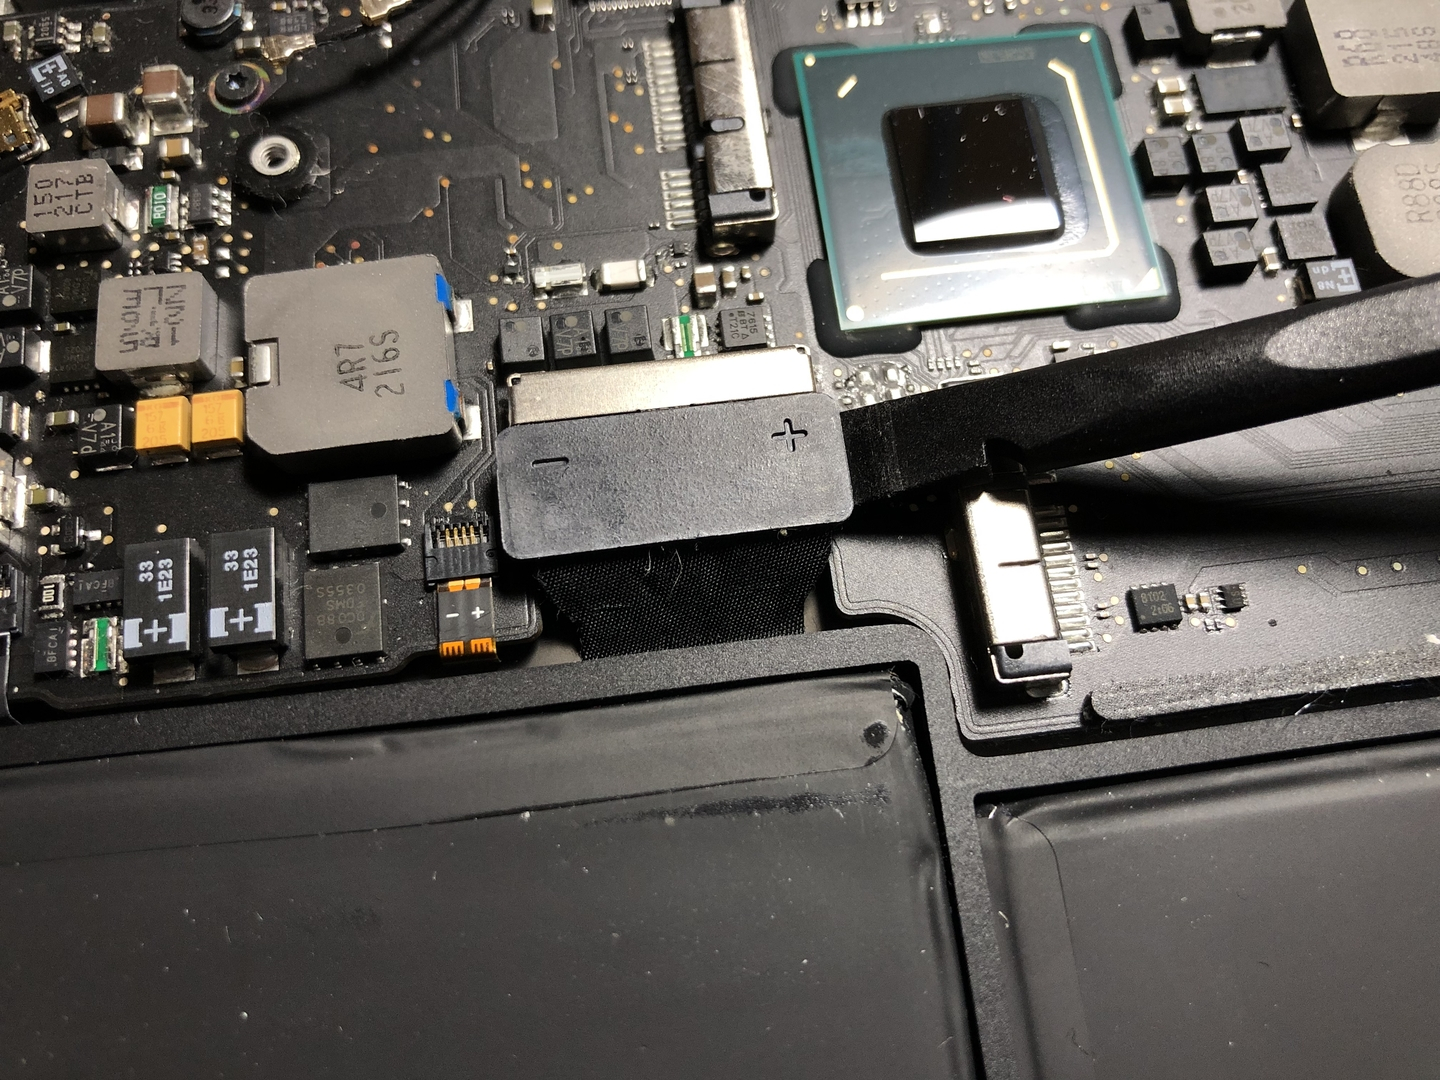
Using a spudger or plastic opening tool, disconnect the battery cable by prying up on the black plastic piece. Lift the connector up and away from the board.
- When repairing electronics, it is always important to remove power from the device as soon as possible, to prevent electric shock or damage.
- Make sure you’re only prying up on the top plastic part.
Step 3: Battery Removal

Remove the T5 Torx screws holding the battery to the case and lift the battery away.
- Only lift the battery by the plastic parts. Avoid touching or pressing the battery cells.
- Make sure nothing metal can contact the battery connector.
- Keep track of each screw’s location.
Step 4: Trackpad Removal (Screws)
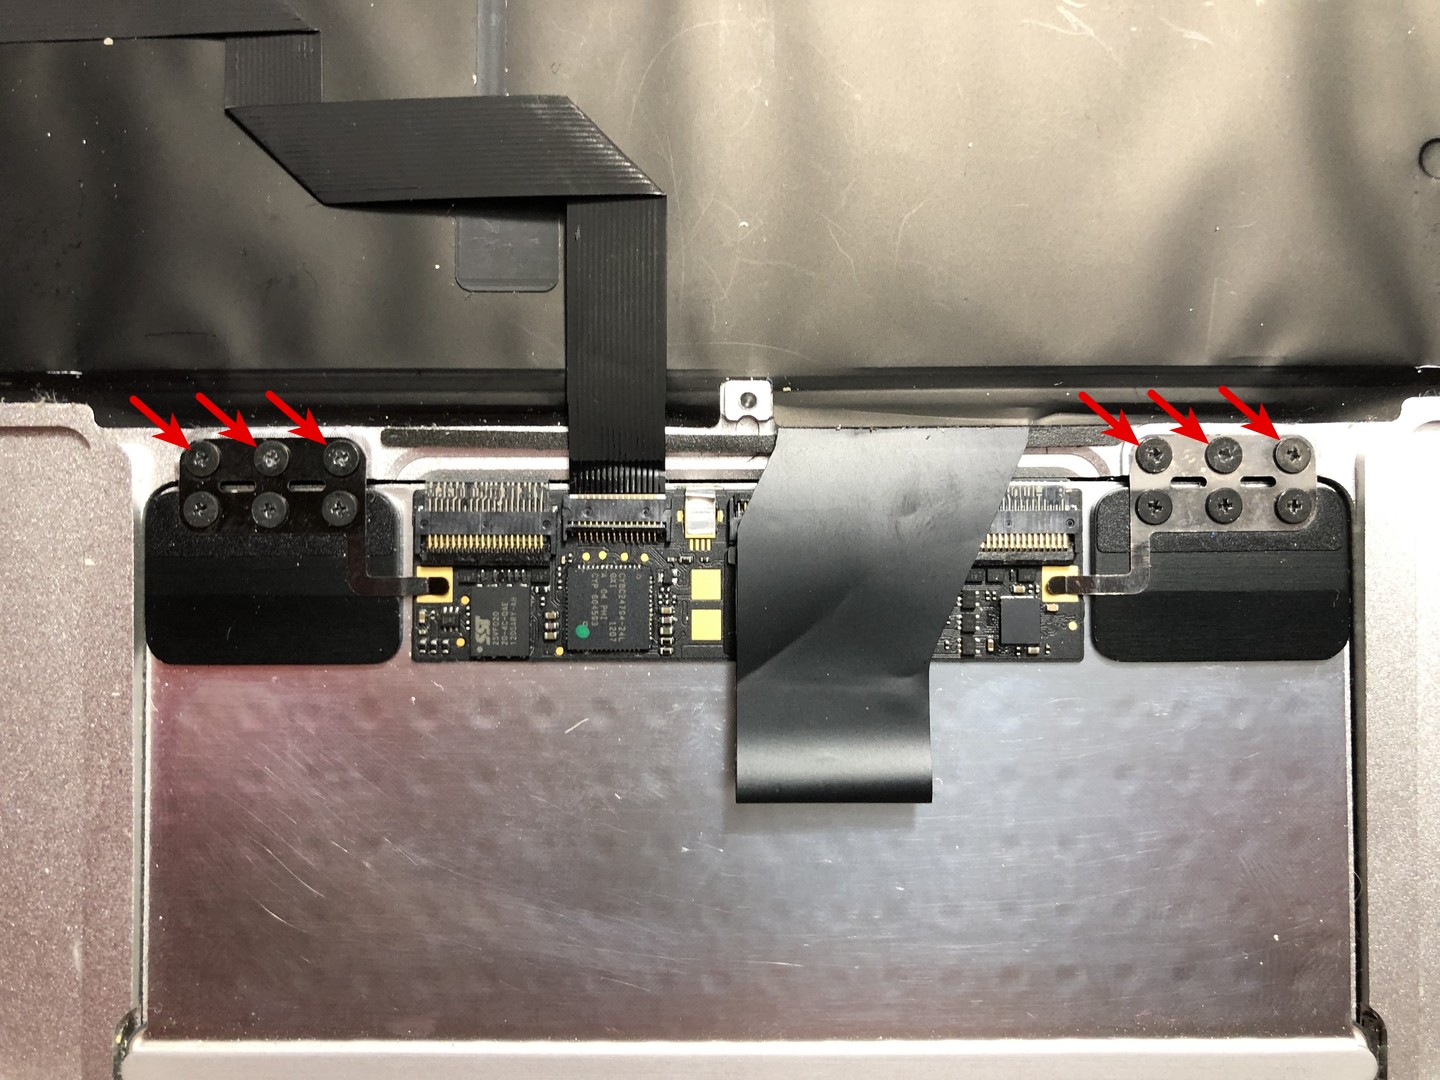
Locate the twelve screws holding the trackpad to the main body. Remove only the top six #000 Phillips screws.
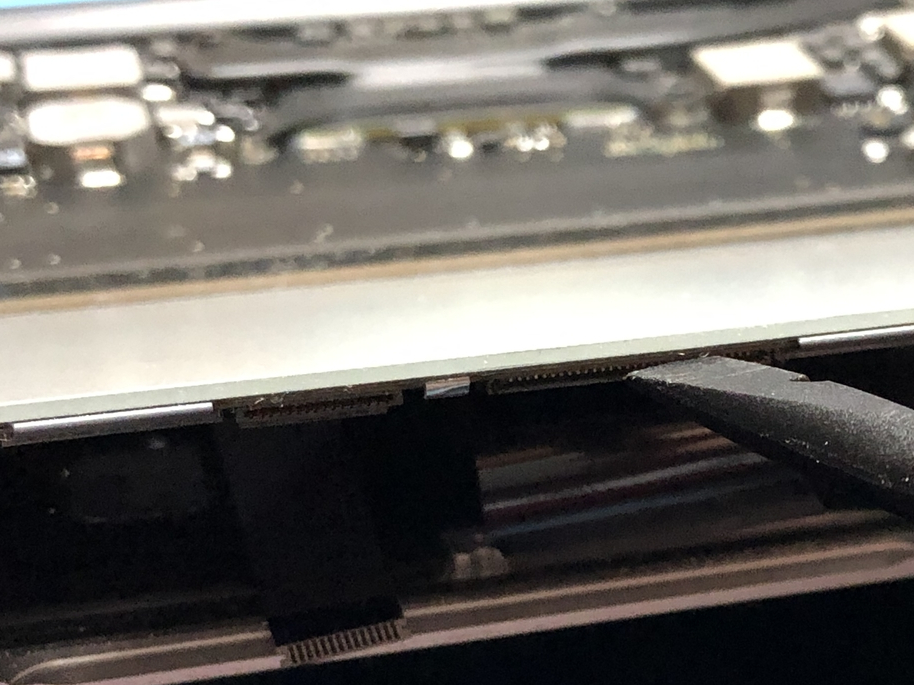
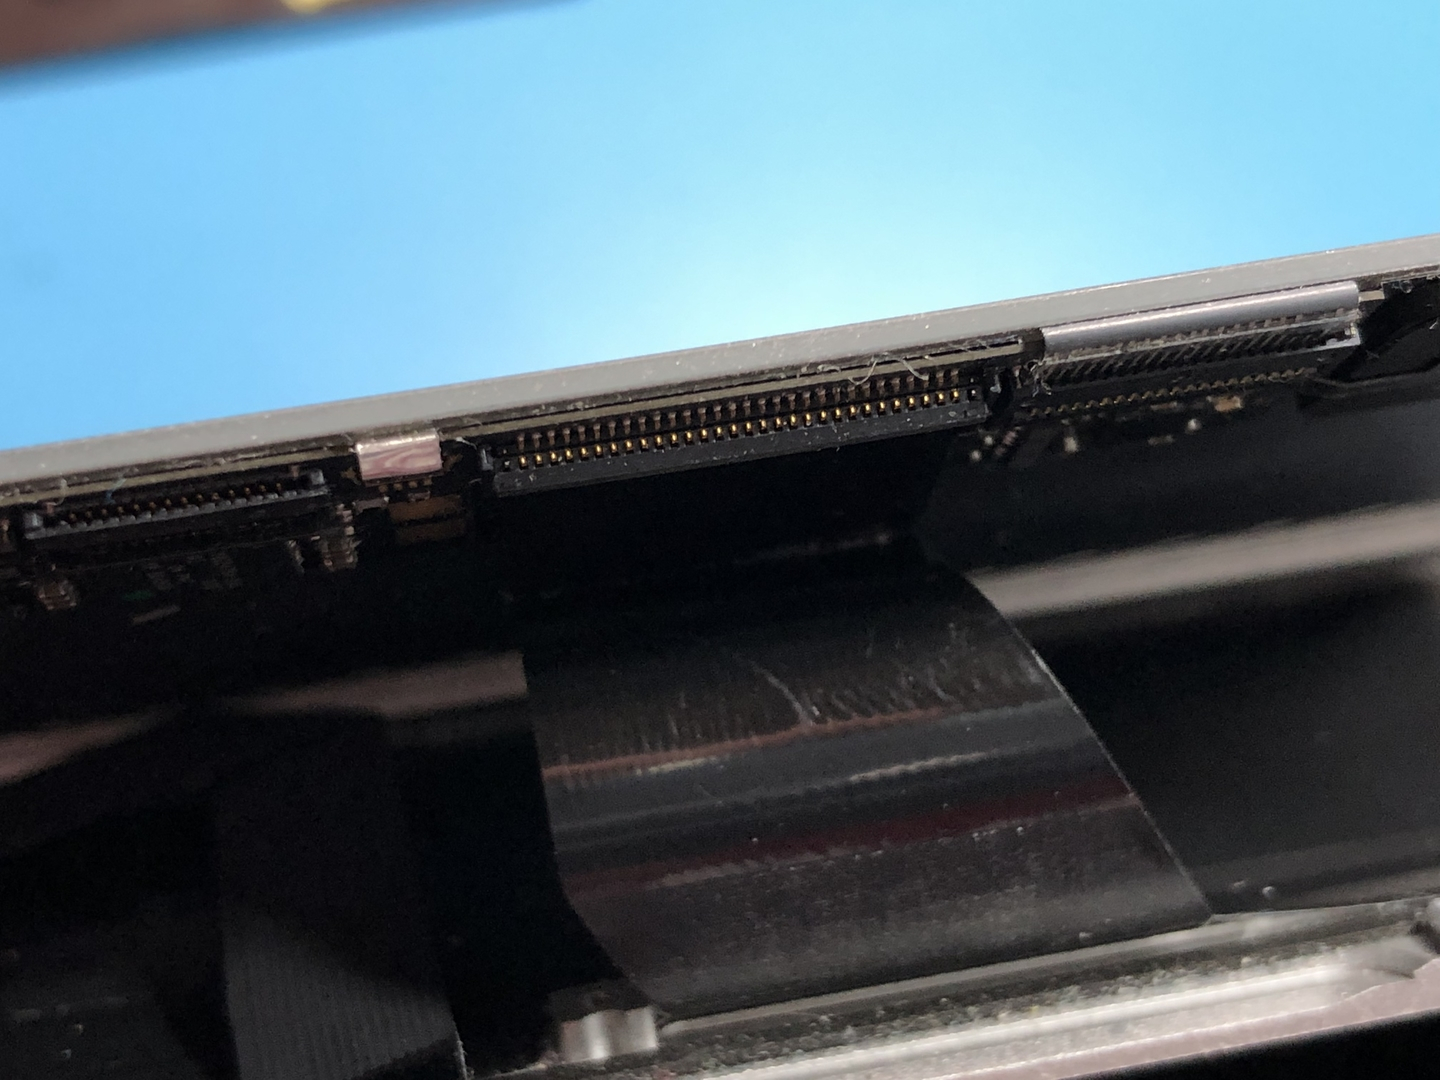
Step 5: Trackpad Removal (Trackpad Cable Unlock)

Use the spudger or a fingernail to unlock the trackpad cable connector. There is a small plastic lever that runs along the entire length of the connector.
- Be gentle, as these connectors are extremely fragile. The lever doesn’t lift very much, so stop when it feels loose.
Step 6: Trackpad Removal (Trackpad Cable
Removal)
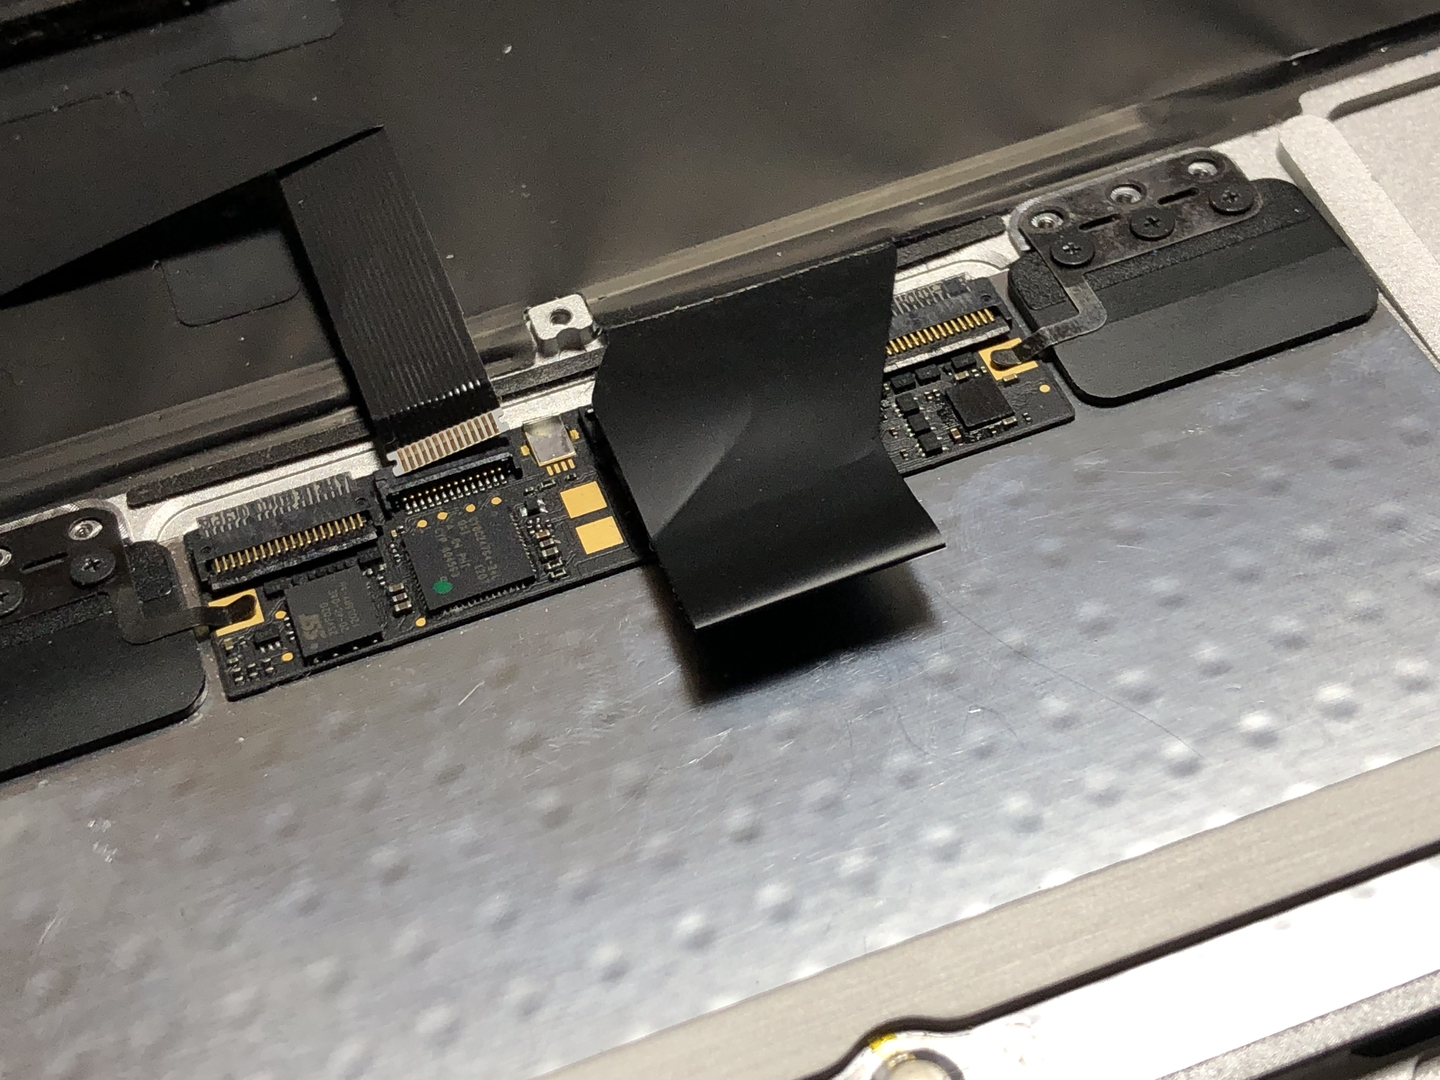
Gently pull away the trackpad cable.
Step 7: Trackpad Removal (Trackpad Repositioning 1)

Open the screen slightly and support the trackpad from behind with one hand to prevent it from falling out. With the other hand, gently push the trackpad up through the casing, as if you were clicking the trackpad.
- Do not remove the trackpad just yet. There’s still a cable attached.
Step 8: Trackpad Removal (Trackpad Repositioning 2)

Flip the trackpad over onto the space left behind by the battery.
- This is a trick to make removing the keyboard cable much easier to remove, since the cable ordinarily covers the locking lever.
- Be gentle, as the keyboard cable is still connected.
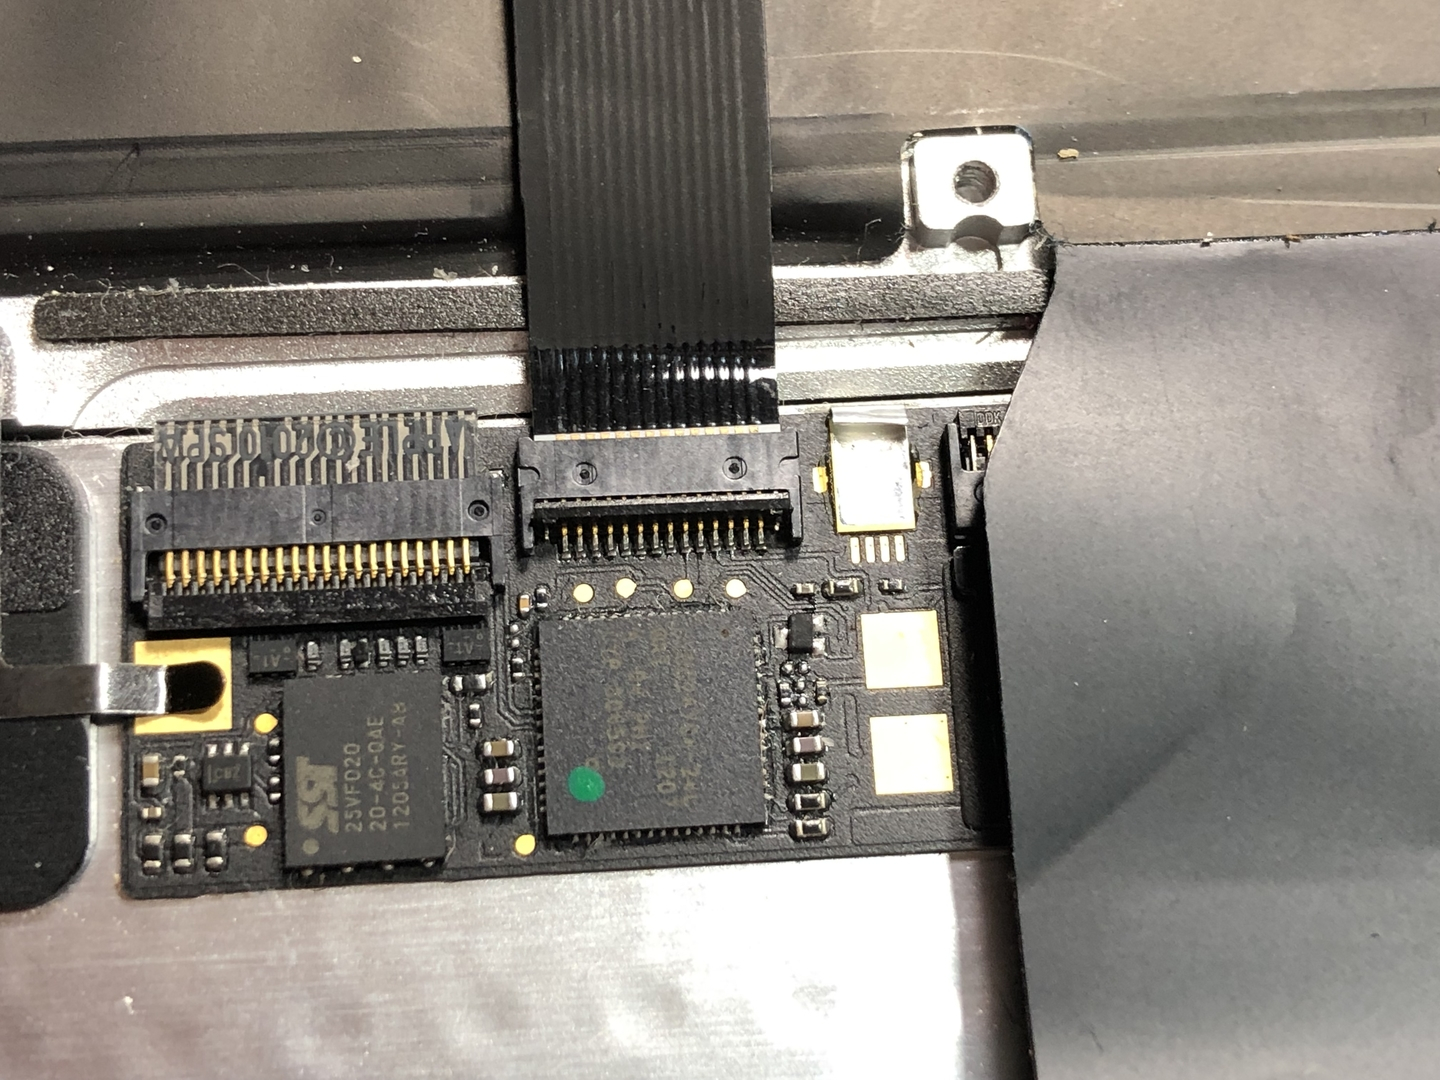
Step 9: Trackpad Removal (Keyboard Cable Unlock)
Using a spudger or fingernail, unlock the keyboard connector
- This connector is also extremely fragile. It helps to start from the edges and gradually work the spudger towards the center.
- Make sure you’re only lifting the locking lever, and not the entire connector.
Step 10: Trackpad Removal (Keyboard Cable Removal)
Flip the trackpad back over (Do Steps 9 and 8 in that order) and pull the keyboard cable away from the connector.
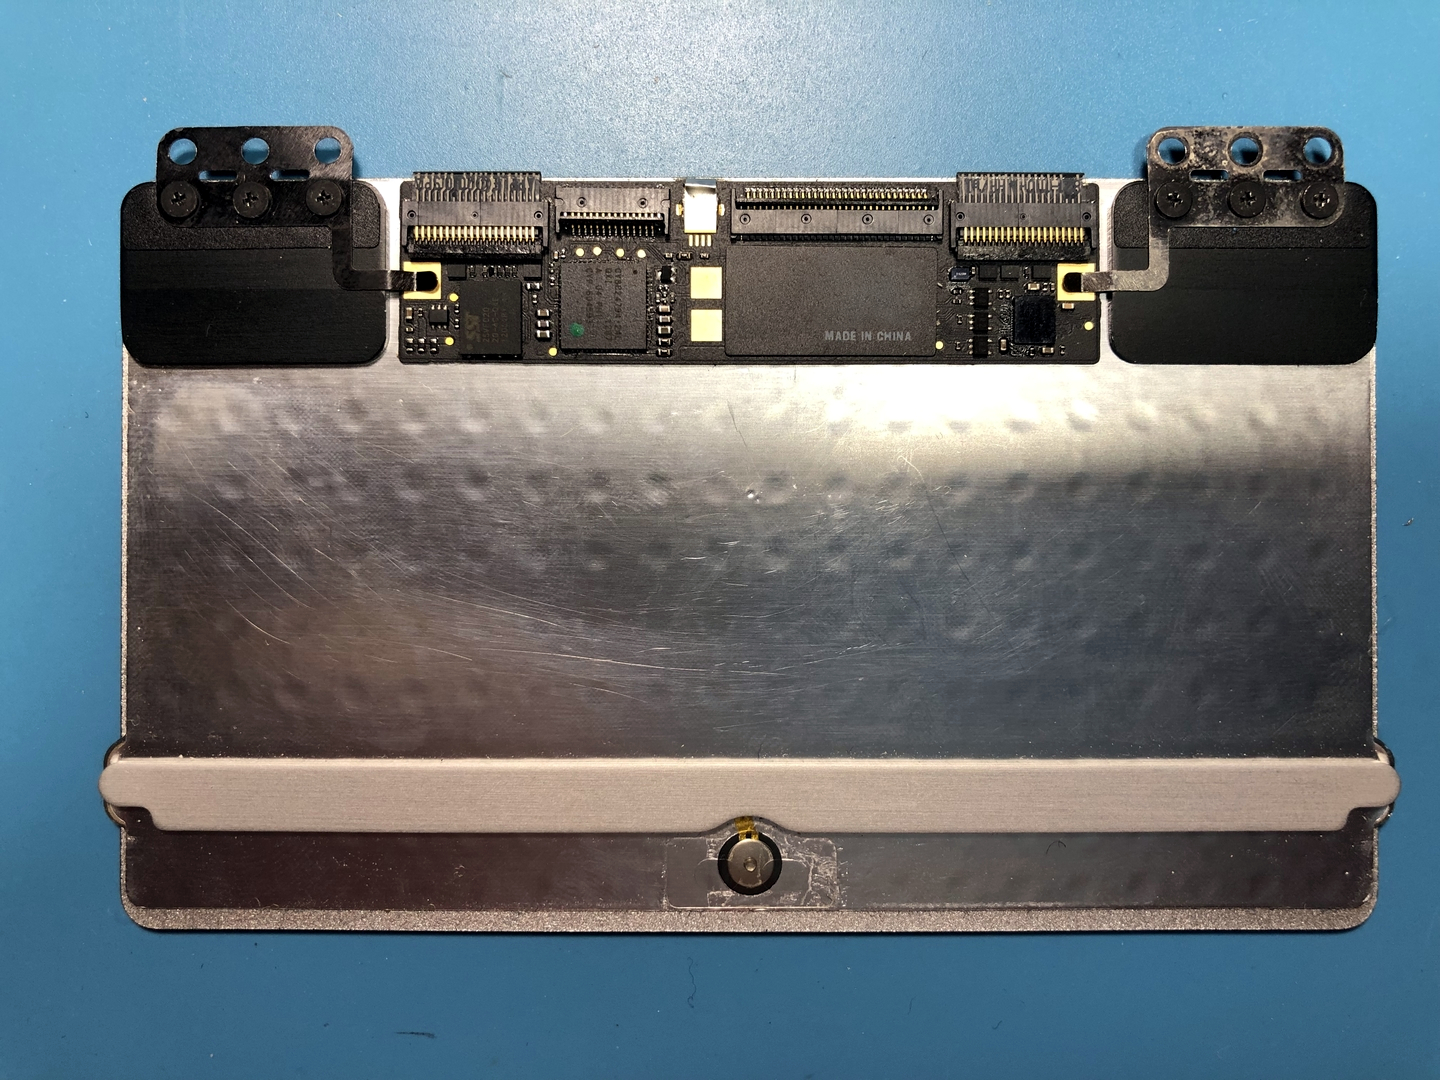
Step 11: Trackpad Removal (Complete)
Trackpad can now be removed from the computer.
Step 12: Sticker Removal
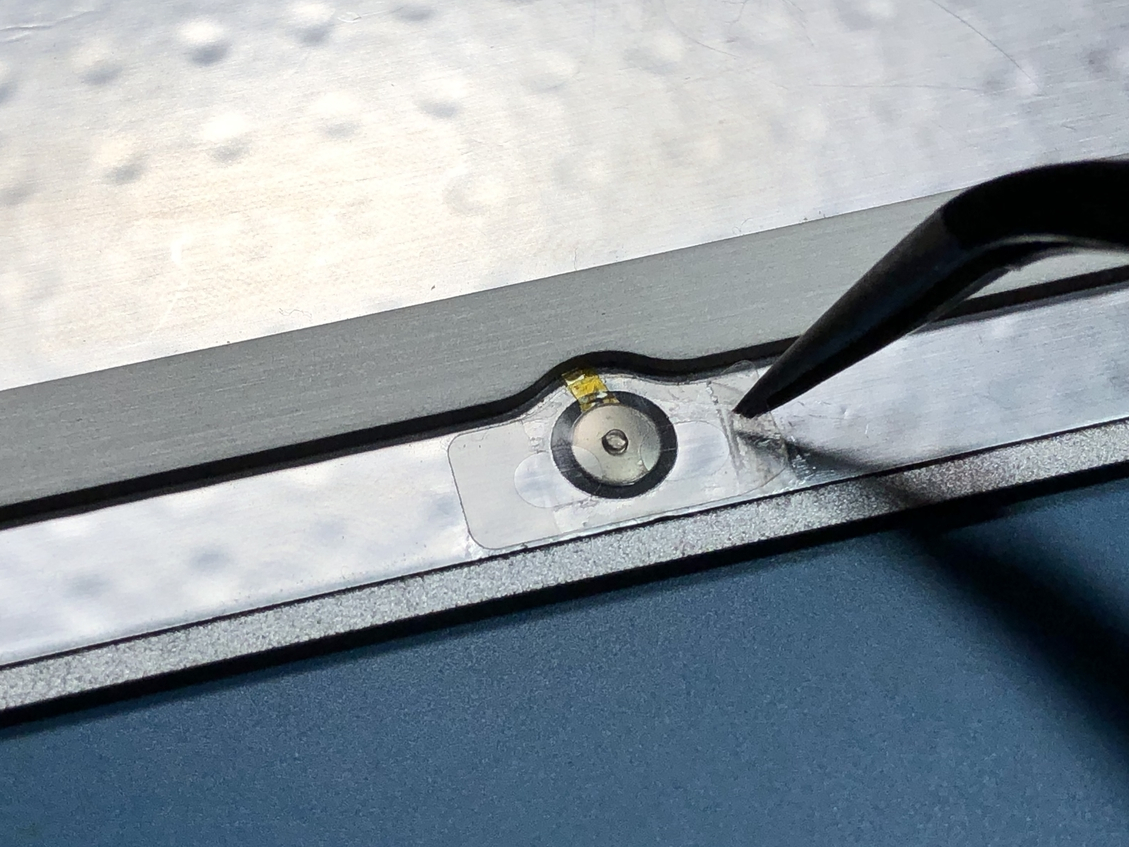

Use the spudger and tweezers to gently peel away the sticker holding the button dome onto the trackpad. Only peel it off half-way.
- It helps to use a hot air station set to 100°C or blow dryer on low. Don’t overdo it, or the plastic components may be damaged. We only want enough heat to soften the adhesive.
- Only pry up on the sticker itself. There is a foil backing on the trackpad that is easily damaged, so try not to damage it.
Step 13: Sticker Replacement 1
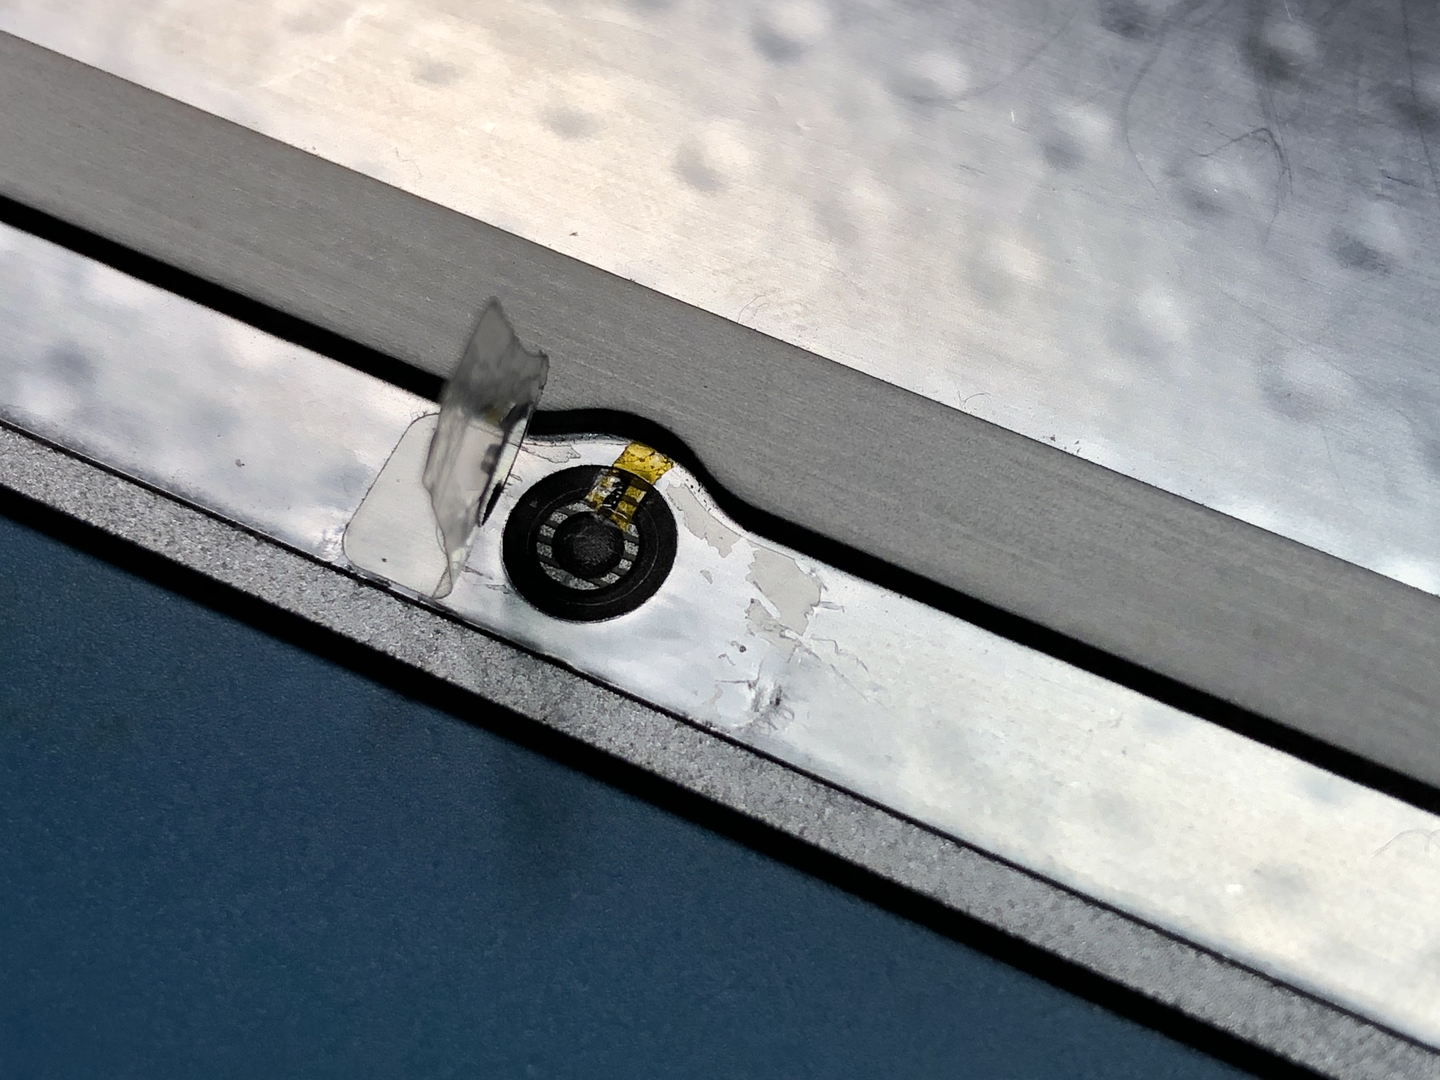
Cut a tiny piece of kapton tape and use tweezers to apply it to the wire leading to the center conductor.
- Be careful not to touch the conductors. Fingerprint oil can cause them to lose their effectiveness.
- Make sure the piece of tape completely covers the center conductor wire, but doesn’t touch the center circular conductor.
- You may need to use the spudger to gently press the tape down into place.
Step 14: Sticker Replacement 2
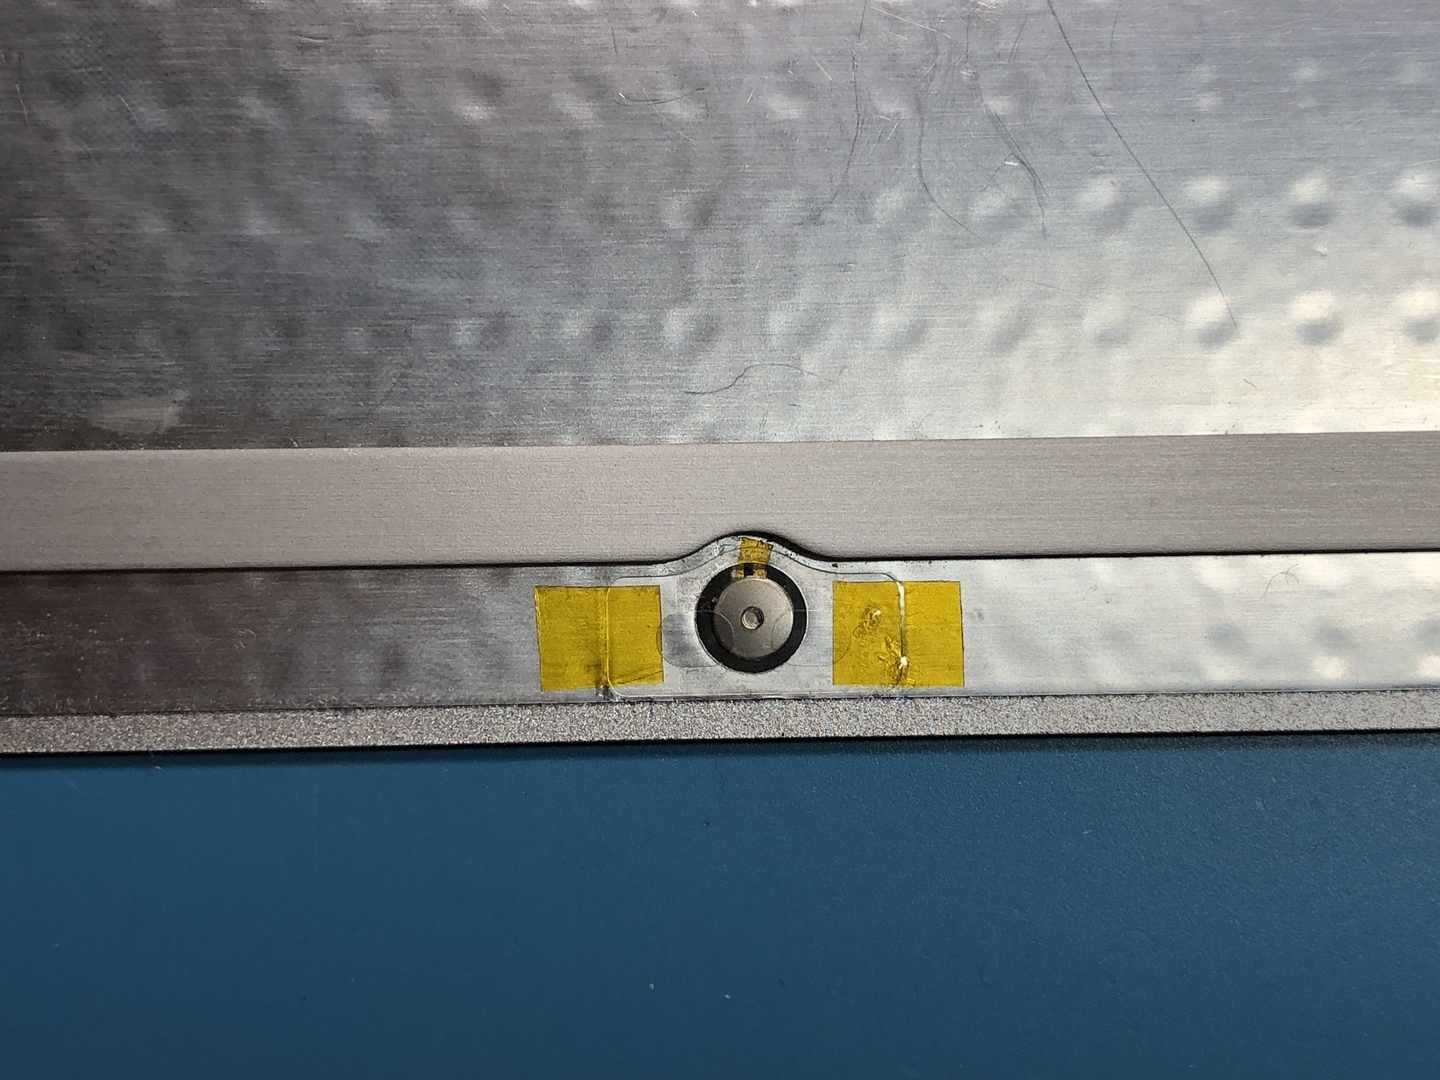
Press the sticker back down and use some more kapton tape to secure the sticker in place.
- Give the dome a few “test clicks” to make sure the replacement insulator doesn’t interfere with its action. You should be able to feel or hear a slight “snap” when you press it.
Step 15: Trackpad Installation (Keyboard Cable Installation)
Place the trackpad back onto the computer’s casing and reconnect the keyboard cable.
- Remember that this cable runs in the opposite direction of the trackpad cable.
- If you have trouble with the cable, flip the trackpad over, plug the cable into the connector, and then flip it back over for the next step.
Step 16: Trackpad Installation (Keyboard Cable Lock)
Gently press the keyboard connector locking lever back down.
Step 17: Trackpad Installation (Trackpad Screws 1)
Screw in the six #000 Phillips screws, but do not tighten. The trackpad must still be able to move a little.
- There’s a gap between the trackpad and the casing, so we need to align the trackpad.
Step 18: Trackpad Installation (Trackpad Alignment)
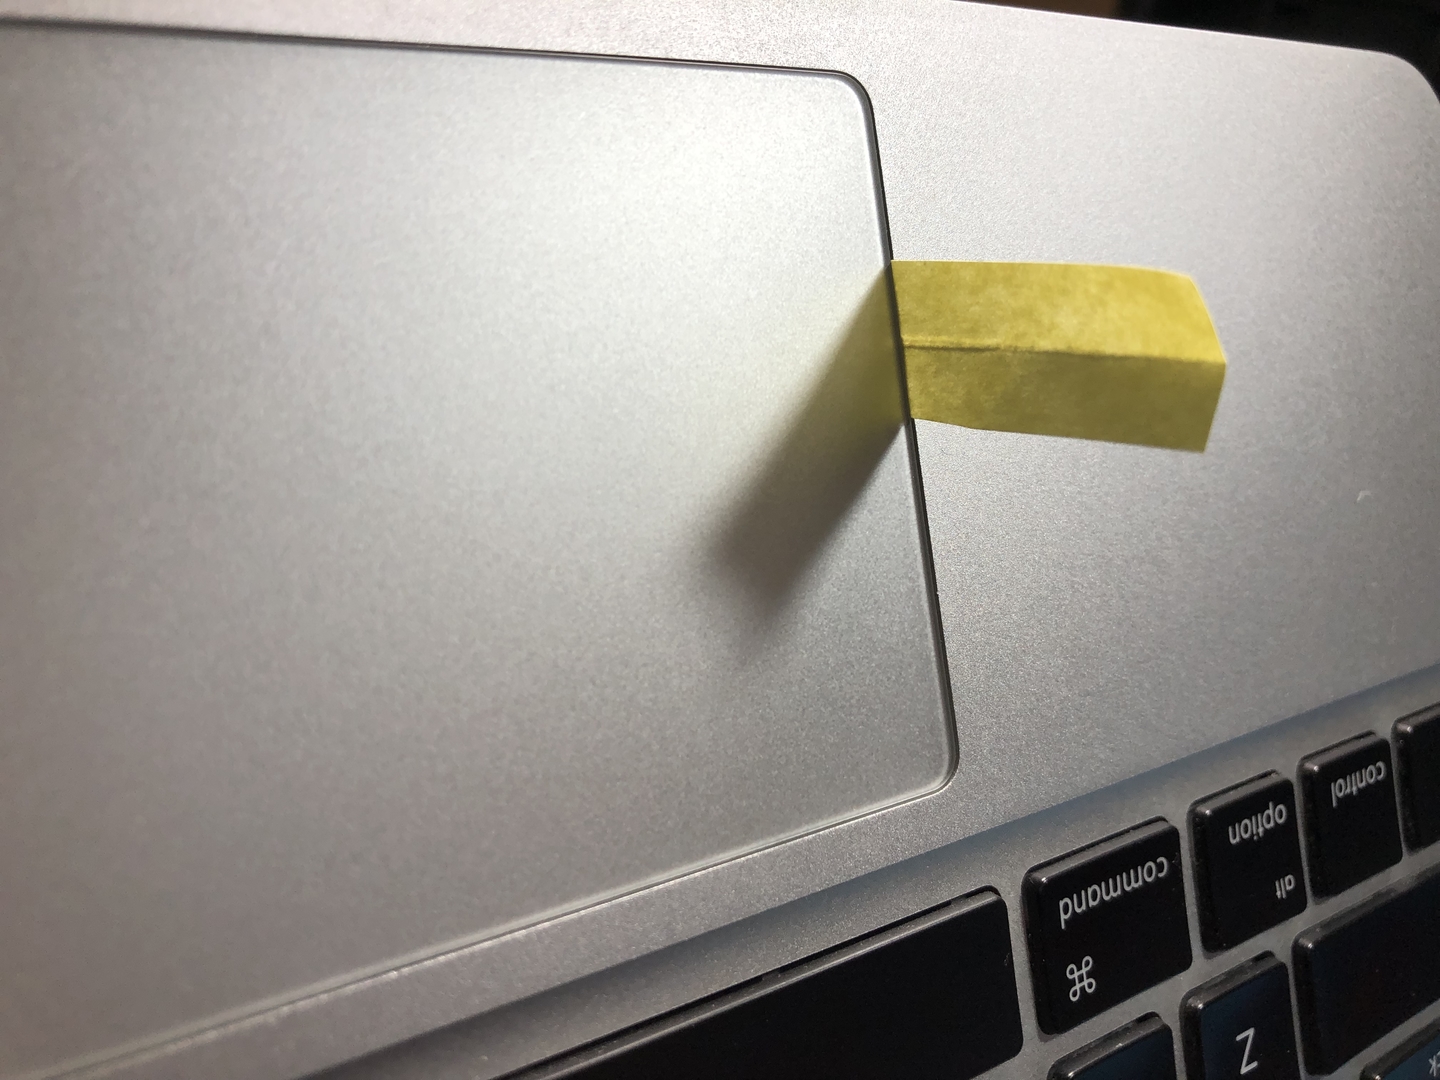
Align the trackpad to the casing. This step is crucial for ensuring your trackpad doesn’t rub against the edges. Sliding folded strips of paper into the gap can help with alignment. It’ll look silly for a bit, but it works.
Step 19: Trackpad Installation (Trackpad Screws 2)
Once satisfied with alignment, tighten the #000 Phillips screws and remove any paper you used in the last step.
- These screws directly thread into the thin aluminum case. Do not over-tighten these screws.
- The screw heads are also really easy to strip. Do not over-tighten these screws.
- I’ve stripped these screws before. Its a real pain to remove these screws once that’s happened. Do not over-tighten these screws.
- They only need to be finger-tight to hold the trackpad in place. Do not over-tighten these screws.
- Do not over-tighten these screws.
Step 20: Trackpad Installation (Trackpad Cable)
Reconnect the trackpad cable and lock the connector.
Step 21: Battery Installation
Re-attach the battery using the T5 Torx screws. Be sure to only use the screws in the locations from which they were originally removed. (Hint: The center screw is longer)
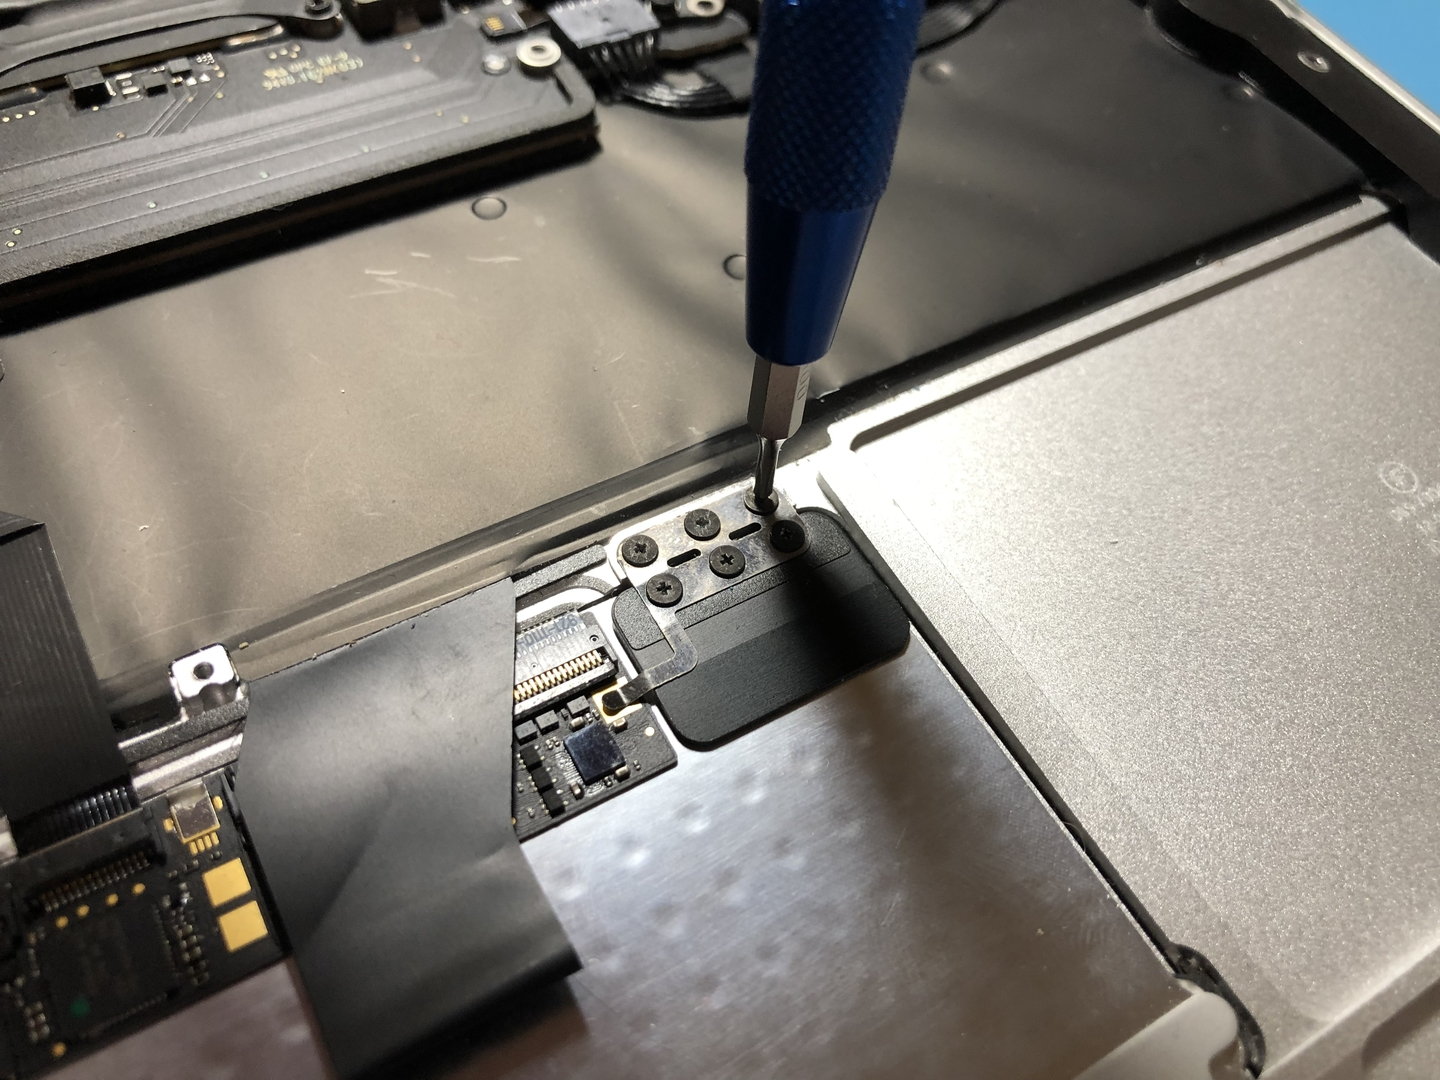
Step 22: Trackpad Adjustment
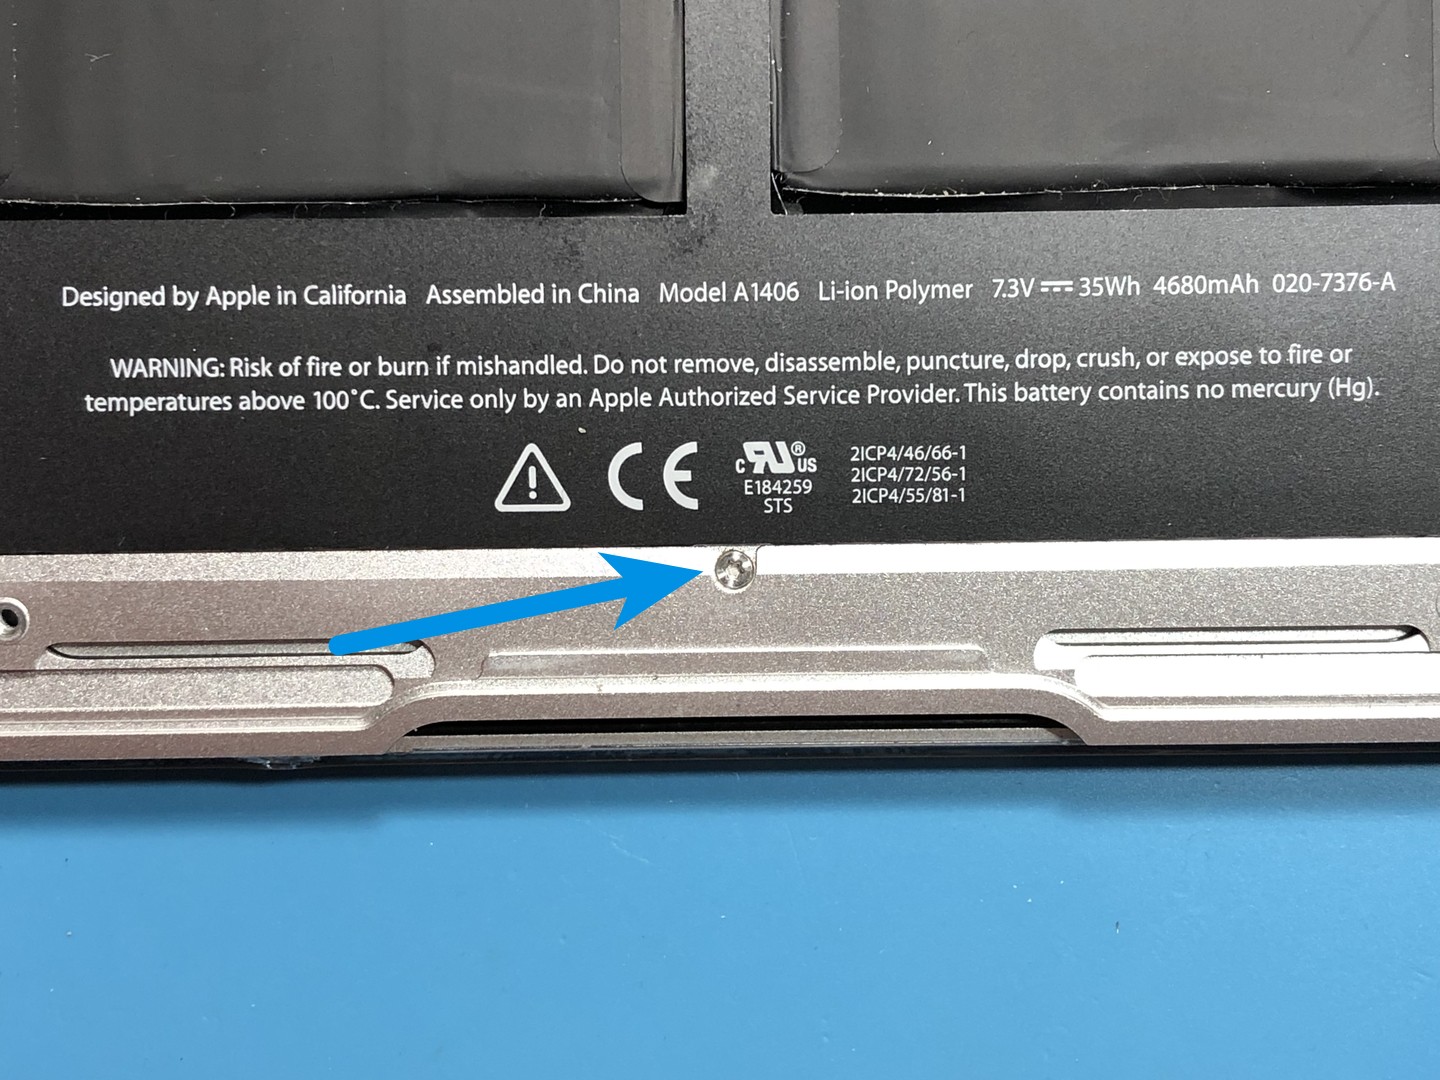
There is a small set screw along the bottom edge of the case. This is the Trackpad Tensioning Screw to adjust click sensitivity. Adjust as necessary using a T6 Torx screwdriver.
- With the laptop upright, lightly press the trackpad until it clicks.
- If there is any “travel” before you feel the trackpad button contact the bottom case, tighten the screw. The screw should barely make contact with the button, even before it clicks.
- If it clicks too easily, loosen the screw. You should still be able to feel or hear the “click” when you press the trackpad.
Step 23: Battery Cable
Plug in the battery by aligning the battery cable with the connector on the board and pressing it into place.
Step 24: Bottom Case Installation
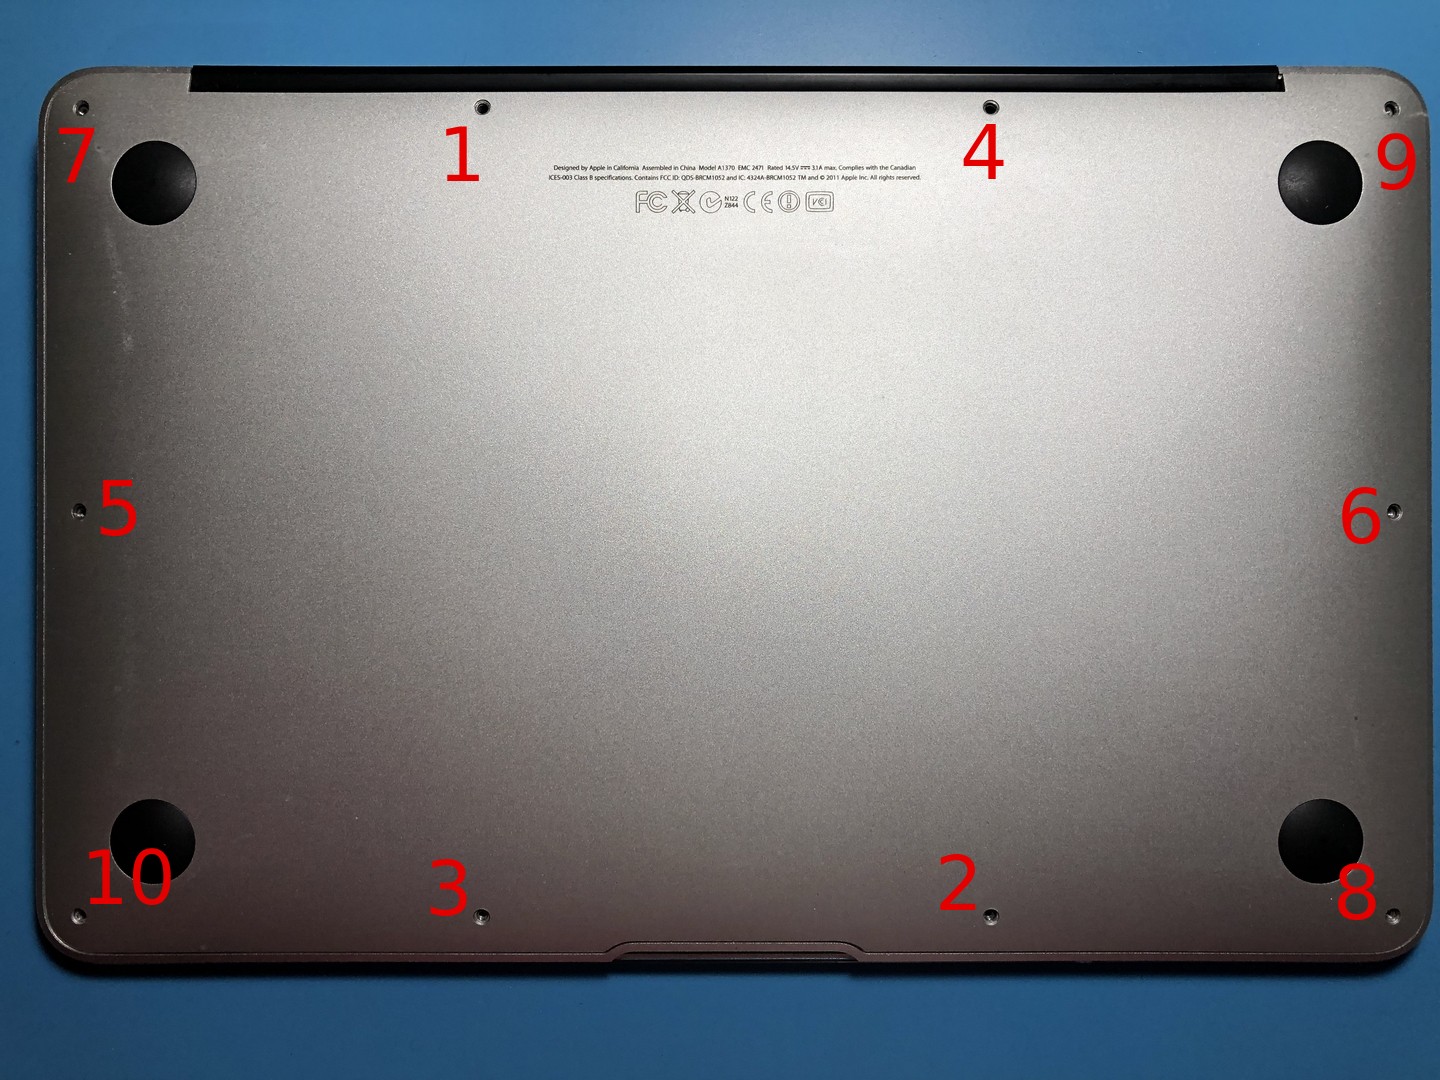 Replace the bottom case and tighten using the P5 Pentalobe screws in their original positions.
- Make sure that all screws can thread at least half-way before tightening them all down.
- Some screws need to come in at an angle. Turn them gently to avoid cross-threading them.
- To ensure the thin bottom case goes on with even pressure, tighten the screws in a “criss-cross” order. I used the order shown in the above picture.
Step 25: Complete
Boot up the machine and test your trackpad. Although I don’t have a picture for this step, I do have proof that this works: I typed this entire post on my newly-repaired laptop!
And with that, the repair is now complete! Tried this repair? Comment down below with your experience!